
Scripting with SwiftUI (I) - Coding a color picker View
Tutorial25 October 2020
Exposition
This tutorial is the first one of a series which aims to offer solutions to use simple SwiftUI interfaces in Swift scripts. The final goal is to have a single file Swift script, that you can easily share, deploy, or compile.
If you are a Swift or macOS developer, you might not find a real interest in this tutorial - and the ones that will follow - as I will try to have a basic approach on Swift and macOS from a developer point of view. That said, you can find the final script in the materials repository, which you can modify if you want to write scripts that use SwiftUI or AppKit.
The materials for this tutorial can be found here. The zip file contains the final script as well as the challenge solution, both in Xcode projects.
AppKit/UIKit or SwiftUI?
A question that the reader may have (and surely many iOS developers too) is: should I use AppKit/UIKit or SwiftUI? As this tutorial focuses on scripting, I think that the simpler and quicker solution is the one to use. And that's why I will use SwiftUI. Although it is still young, sometimes a bit buggy, and does not offer as much features as AppKit or UIKit yet, I personally find it to be the best approach to code interfaces in Swift scripts. I shall add that in case you would need it, an AppKit version of the final script is included in the materials (ColorPicker (Appkit - final)), so that you can see how things would be done with it, or simply have a version that can run on macOS 10.15 or lower (SwiftUI can run on macOS 10.15+).
What you will learn
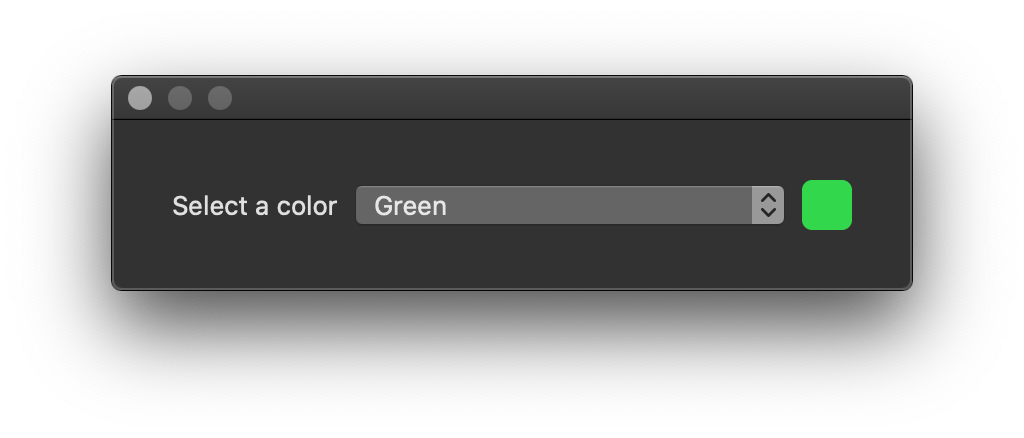
The goal of this tutorial is to code a simple color picker window with SwiftUI to let the user choose a color with visual representation. Bye-bye command-line! (Just kidding, don't be mad command-line, I am still loving you). Here is how it will look like in the end.
Should you use Xcode?
On one hand you should know is that you don't need Xcode to run a Swift script. You can write one in your preferred text editor, and then run it in the command-line as any other script. On the other hand, by writing a script with Xcode, you get the auto-completion, and can run it a bit more easily. All you will have to do when sharing your script is renaming it. So it's up to you to choose your approach. If you want to use Xcode, here is how you can setup your project.
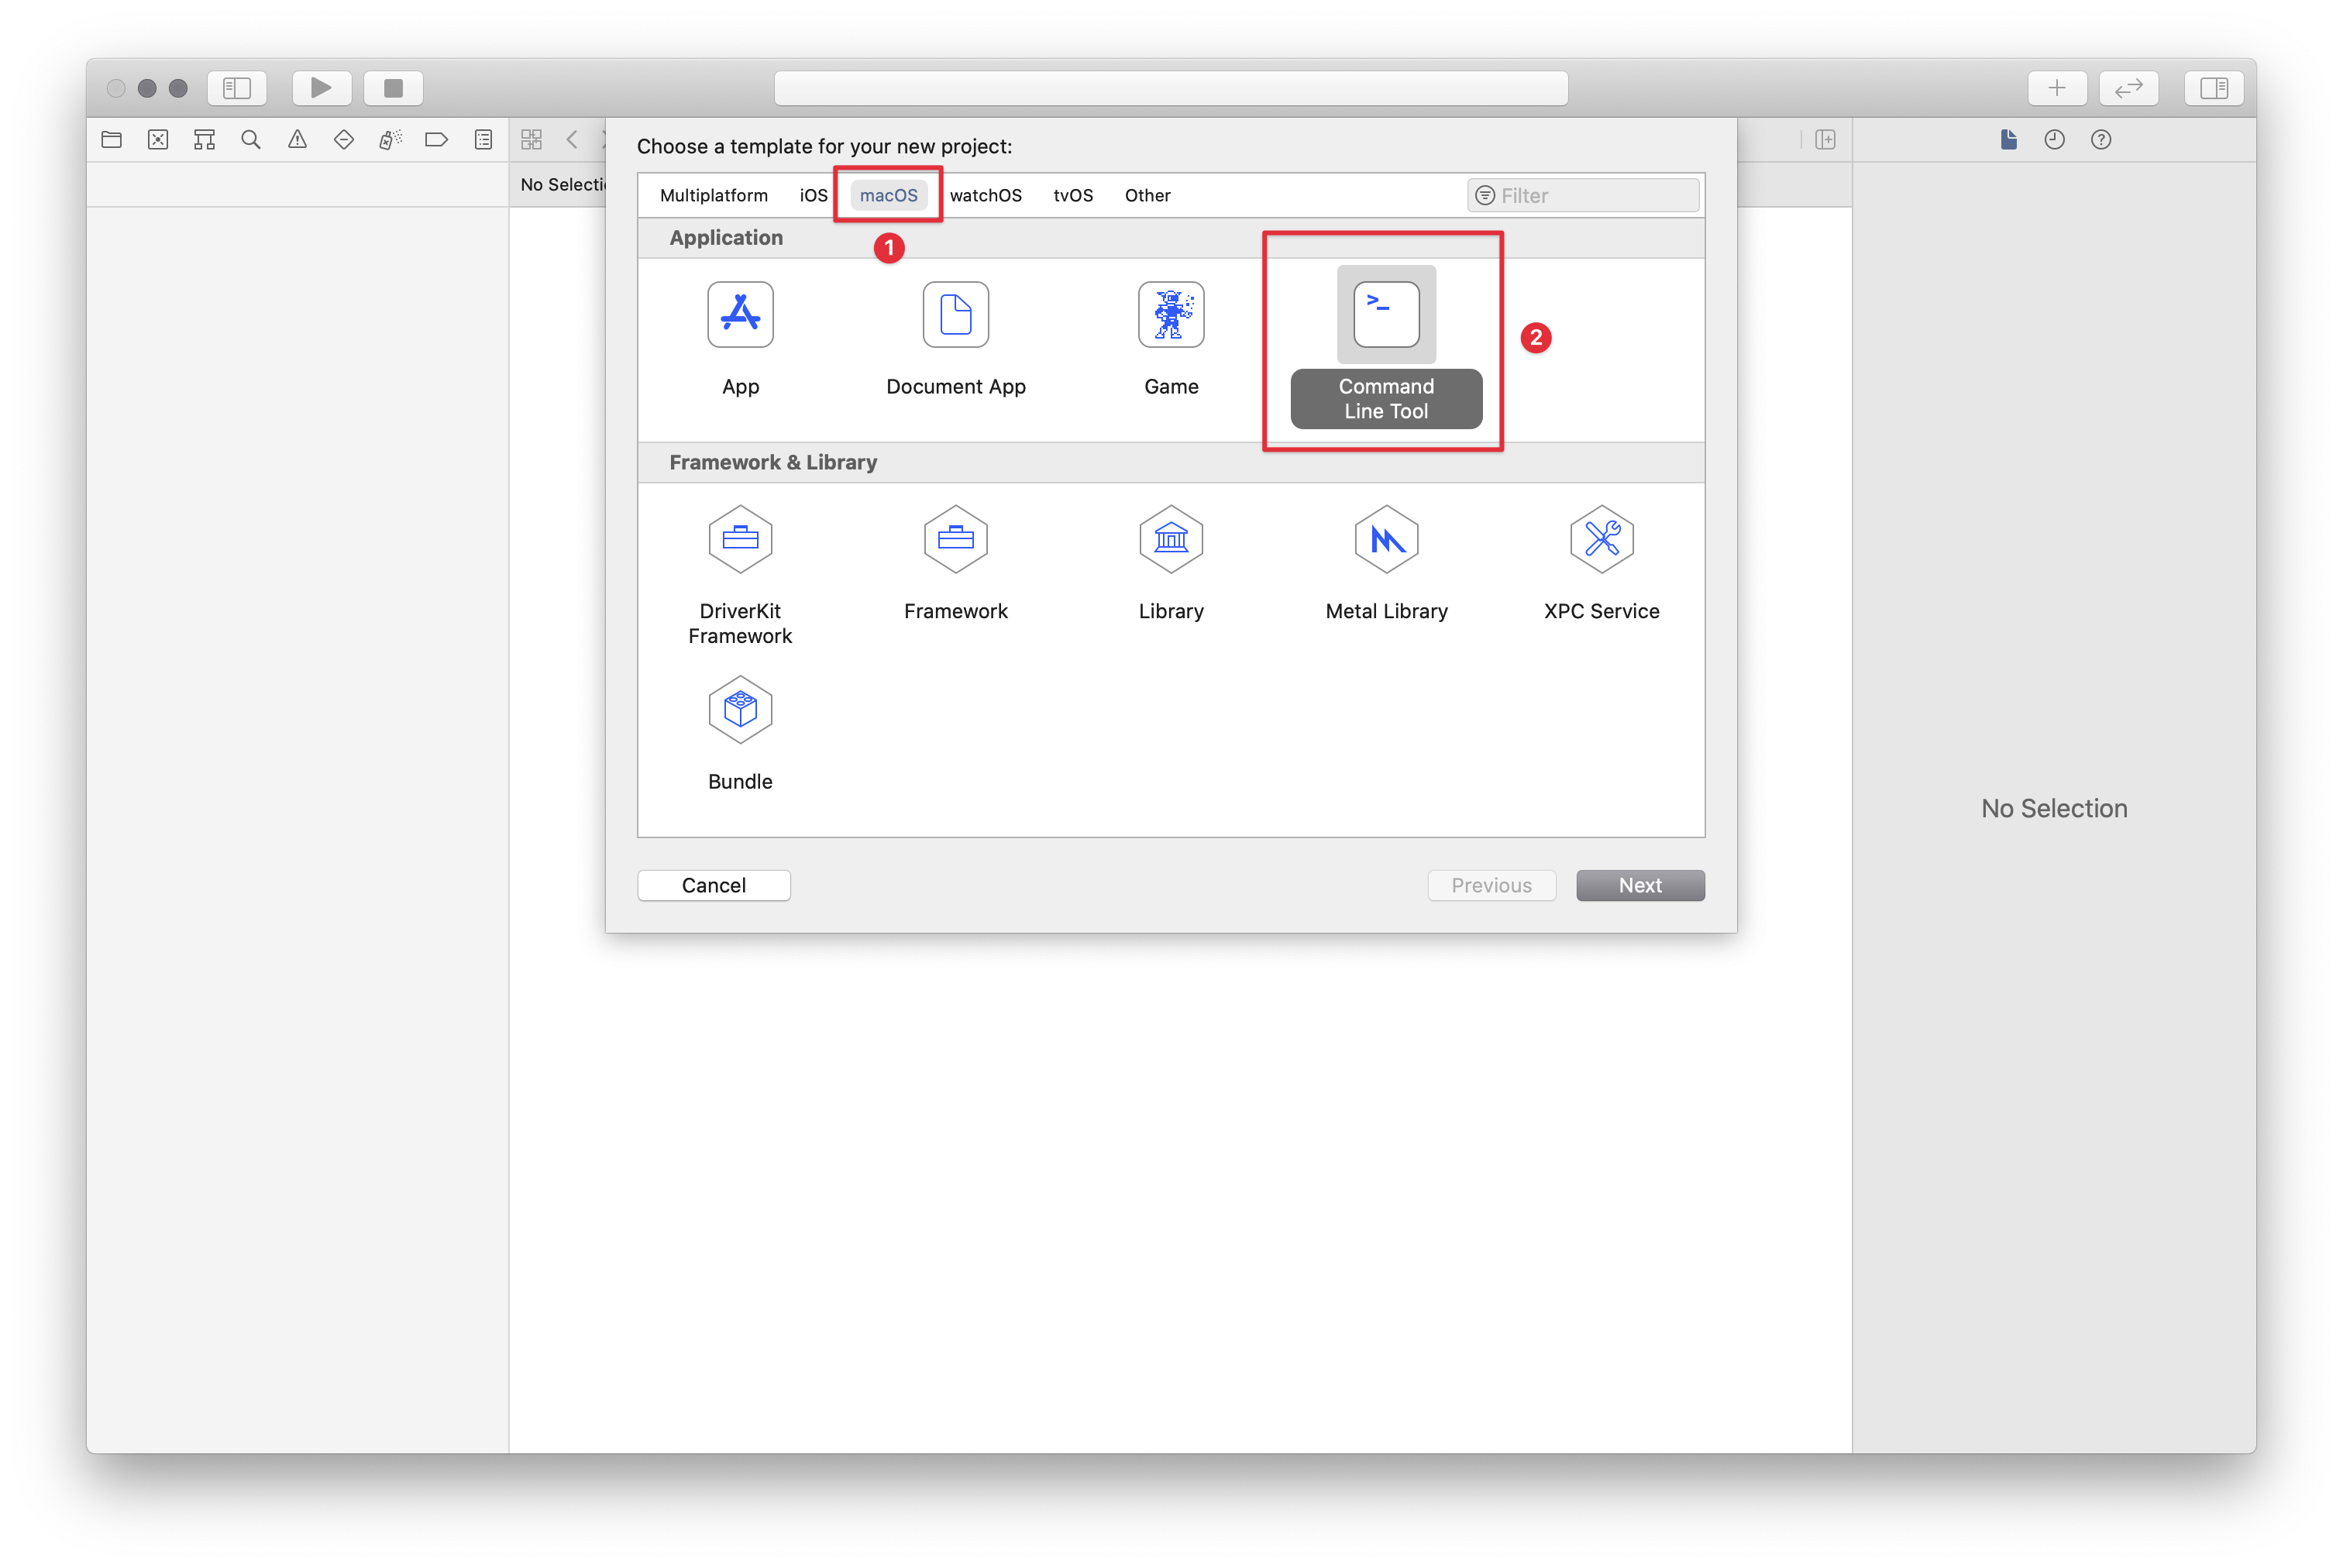
First, create a new project in Xcode.
print("Hello, World!") inside it! You can remove it.
The code inside this main.swift file will be executed when you hit the "Run" button. That's our script file. The one that you can then share by simply copying and renaming it.
Setup the app
Now, this might seem confusing, especially if you are used to develop iOS or macOS applications: there is no AppDelegate where we can inject the code to setup the window here! That's the key part of developing interface in Swift scripts: you are about to create one yourself. Do not worry though, it's not as hard as it could seem. Let's try to do that.
First, we need to access to NSApplication.shared. It will allow us to create an application instance, then to run it. Also, we have to provide an NSApplicationDelegate to the app instance In order to do perform the setup once the app is launched. Similarly to a classic iOS or macOS app, this delegate can declare a window, which the app will then use as the initial window when launching. Here is how it looks like.
// 1
#!/usr/bin/swift

// 2
import Cocoa

// 3
let app = NSApplication.shared

// 4
let origin = CGPoint(x: NSScreen.main?.frame.midX ?? 50,
                     y: NSScreen.main?.frame.midY ?? 50)

// 5
class AppDelegate: NSObject, NSApplicationDelegate {

    // 6
    let window = NSWindow(
        contentRect: NSRect(
            origin: origin,
            size: CGSize(
                width: 400,
                height: .zero
            )
        ),
        styleMask: [.titled, .closable],
        backing: .buffered,
        defer: false,
        screen: nil
    )

    // 7
    func applicationDidFinishLaunching(_ notification: Notification) {

        // setup the window
        window.makeKeyAndOrderFront(nil)
        NSApp.setActivationPolicy(.regular)
        NSApp.activate(ignoringOtherApps: true)
    }

    // 8
    func applicationShouldTerminateAfterLastWindowClosed(
        _ sender: NSApplication) -> Bool {
        return true
    }
}

// 9
let delegate = AppDelegate()
app.delegate = delegate

// 10
app.run()- We use a shebang to indicate that this script is written in Swift
- We have to import AppKit or Cocoa to use the application related types
- We instantiate a
NSApplicationinstance, as described in the documentation. - When instantiating the window, we have to give it a frame, which can be specified with a
CGPointserving as the origin of the frame, and aCGSize. Here we choose to set the origin at the middle of the main screen (if you have several monitors, the main screen is the one you chose in the preferences pane). If no screen can be found (which would be very unfortunate), the origin is arbitrarily set to an offset of 50 points from the screen origin. - We declare a class implementing the
NSApplicationDelegateprotocol, which is similar to what Xcode provides us when starting a new project. Making that class a subclass ofNSObjectis a requirement of the protocol.In case you are wondering what a protocol is, you can think of it as a contract. A type implementing the protocol declare that it respects this contract by meetings its requirements. This allows other types to know that this type meets the requirements, without having to specifically know it. To give you an example, let's say you want to learn French, and you post an ad saying that you want to have a call with a french person. The only thing you care about is that the person speaks french, regardless of their age, their jobs, their name... This kind of abstraction is great to hide the implementation details, and thus to make the objects more independent from each other.
- We declare the window that we will use to hold the views. We give it a frame using the origin defined in step 4, a width of 400 and no height. The height will be changed automatically when we will give the window a SwiftUI view. Also, we make it having a title bar and closable. There are many options, as detailed here, to customise the window, which are described as its style mask. You can ignore the other parameters for now, as we give them default values.
- The function
applicationDidFinishLaunching(:)will be called by the app in the delegate when it has finished to launch - as indicated by the name 😁. That's our opportunity to inject the code to make the window visible when launched from a script. Those three lines really are non-intuitive Cocoa stuff. It makes the window appear above others when the app is launched, and lets us fully interact with it once launched. This way, we can almost have a standard application running. - This function will be called by the system when the last window is closed. By returning
true, we indicate that the app should be terminated when its last window is closed. - We declare an instance of the
AppDelegateclass, and assign it as the delegate of the window. - When all the setup is done, the app can be launched. Each time the script or main.swift file is executed, all the setup will be evaluated and at the end
app.run()will start the app.
About the @main
Starting from Swift 5.3, you can indicate to Xcode the entry point of your program by using the @main attribute, rather than declaring a whole main.swift file, as explained in the proposal (or in this post from Paul Hudson). We could definitely use it here, but in this case we would not be able to share the script without archiving it with Xcode. Also, we would not be allowed to use the Swift shebang.
This @main attribute is especially useful in coordination with the Swift argument parser library, as we will see in an upcoming tutorial dealing with how to write and share a Swift executable file.
You can try to run it now, although it might be disappointing as nothing will appear. That's logical as it has no content. Anyway, that's the skeleton of our script, which we will reuse in further scripts and tutorials. Now that we have it, let's add some flesh! 💀
Fill the window
Before coding the whole interface, let's try something simple to make sure the window appears properly. We will display a short text inside it. We have two steps to perform in order to do that. First, we have to declare a SwiftUI View with the text inside it. Second, we have to inject that in the window.
So, if it's the first time you coding a SwiftUI view, get ready to enter in the marvellous world of SwiftUI!
Coding a catch phrase view
First things first, let's import SwiftUI. To do so, add the import SwiftUI statement just below he import Cocoa one. Then, write the following under the let origin = ... statement.
// 1
struct CatchPhraseView: View {
    // 2
    var body: some View {
        // 3
        Text("I got a snake in my boot!")
            .font(.title) // 4
    }
}- To implement a SwiftUI
View, what we need to do is to declare astructimplementing theViewprotocol. Here, thisstructis named "CatchPhraseView" as its purpose is to display a catch phrase.
TheViewprotocol has only one requirement. We have to declare abodycomputed property, which is like a function but that takes no parameter. - This
bodyproperty should return someView. That's something a bit different from simply returning a type implementing theViewprotocol. When we declare that thebodyproperty returnssome View, this prevents us from mixing the returned type. It allows SwiftUI to know that only one type will be returned, although this type is hidden behind theViewprotocol - which improve performance. It's bit abstract, and it's not the purpose of this tutorial to tackle this topic, so I prefer to give you a link that explains this feature clearly.
For now, it's not really important to fully understand how it works, and we can simply use it. - Inside this
bodyproperty lies the subview hierarchy. Here, we declare the views we want to see inside theCatchPhraseView. As you can guess, we use aTextstructure to display text. This structure implements theViewprotocol and is one of the many others SwiftUI offers as built-in views, likeImage,Button.. and many more! - SwiftUI uses modifiers on views so that we can easily change a view appearance or behavior. Here we are specifying that the text inside the
Textview should use the system title font.
That's it for step one! Before we take care of the second step, let's pause a bit and think about what we just wrote. Four lines of code. That's all it takes to display text in a SwiftUI view, and it's really not much. If you are used to AppKit/UIKit and Auto layout, this is a huge benefit to write small interfaces. If you want to make sure of it, you can take a look at how things would have been done with AppKit.
Providing the view
To set the CatchPhraseView as the view of the window, we have to use the window contentView property. Unfortunately, this property is a NSView, and cannot be set with a SwiftUI View. So we have to wrap the CatchPhraseView inside a a NSView. That's fairly easy as Apple provides the perfect class for that: NSHostingView. The name is quite verbose: the purpose of this subclass of NSView is to host a SwiftUI View. You can add this line below the last statement in the applicationDidFinishLaunching(:) function.
window.contentView = NSHostingView(rootView: CatchPhraseView().padding(30)) We add a padding of 30 points to the CatchPhraseView to ventilate the layout.
You can now execute the script! The window should appear:
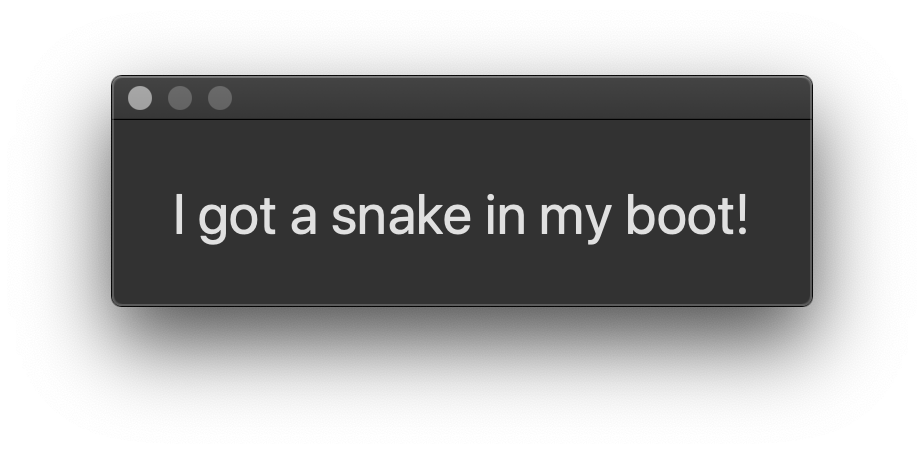
Here is the code if you want to make sure you did not forget anything.
#!/usr/bin/swift

import Cocoa
import SwiftUI

// MARK: - Constants

let app = NSApplication.shared
let origin = CGPoint(x: NSScreen.main?.frame.midX ?? 50,
                     y: NSScreen.main?.frame.midY ?? 50)

// MARK: - Views

struct CatchPhraseView: View {

    var body: some View {
        Text("I got a snake in my boot!")
            .font(.title)
    }
}

// MARK: - Setup

class AppDelegate: NSObject, NSApplicationDelegate {

    let window = NSWindow(
        contentRect: NSRect(
            origin: origin,
            size: CGSize(
                width: 400,
                height: .zero
            )
        ),
        styleMask: [.titled, .closable],
        backing: .buffered,
        defer: false,
        screen: nil
    )

    func applicationDidFinishLaunching(_ notification: Notification) {

        // setup the window
        window.makeKeyAndOrderFront(nil)
        NSApp.setActivationPolicy(.regular)
        NSApp.activate(ignoringOtherApps: true)

        window.contentView = NSHostingView(
        	rootView: CatchPhraseView().padding(30)
		  )
    }

    func applicationShouldTerminateAfterLastWindowClosed(
        _ sender: NSApplication) -> Bool {
        return true
    }
}

let delegate = AppDelegate()
app.delegate = delegate
app.run()
If you wonder what the // MARK: are, they are comments that Xcode will display as separators in the code. It is really useful when you want to have visual separation of content, like here with the constants, the views and the app setup. More info.

And we have a running script with a SwiftUI interface! That's great. Especially as we did not have to write a lot of code to get this result. Now, it might be useful to offer some interaction to the user, right? Like choosing a color, hm? You read in my mind 🤯 That's the next section.
Code the color view
To show the current color to the user, we are going to display a rounded square, filled with the current color. But wait, where are the colors defined? We are about to implement them. But first, lest ask ourselves: how should we use those colors? We need a color to fill the square, but also its name to fill the popup button. So we need to wire the two. There are several ways to do so in Swift. I went for an array of tuples, which are couple of values so here it would be couples of color name and value. Feel free to use another storage type, like a dictionary. To follow along the tutorial, you can add this line right below the one where we define the origin property.
let colors: [(name: String, value: Color)] = [("Red", .red),
                                              ("Green", .green),
                                              ("Yellow", .yellow),
                                              ("Orange", .orange)]
We take advantage of the Swift powerful type inference feature to not have to write Color.[colorName] every time, since we define an array composed of String and Color tuples (which are couples of values, once again).
Now for he color view: please delete all the CatchPhraseView structure, and replaced it with the following:
// 1
struct MainView: View {
    // 2
    var selectedColor = 0

    var body: some View {
        // 3
        Rectangle()
            .fill(colors[selectedColor].value)
            .frame(width: 25, height: 25)
            .cornerRadius(5)
    }
}- Rather than defining a
ColorView, we implement here aMainViewthat will hold both the view to display the current color, and the popup button to choose it. - We need to store the index of the color chosen by the user in order to wire up the displayed color and the choice of the user. This allows us to get both the current color name and value by getting the tuple at the
selectedColorindex in thecolorsarray. To get the current tuple, we need to pass the index between brackets:colors[selectedColor]. Then to get the name, we can simply call the name property:colors[selectedColor].name. The same goes for the value:colors[selectedColor].value - With AppKit or UIKit, we would have used a
NSVieworUIViewwith a frame and a coloured background. But SwiftUI comes with built-in shape that we can use very easily. So here we declare that we want to use a rectangle, filled with the current selected color from ourcolorsarray. Also, we want it to have a frame of 25x25 points and apply a radius of 5 to its corners.
It's pretty declarative right? You don't need to create an instance and assign values to its properties. That is the main purpose of SwiftUI: to be declarative. We will dive more into this topic in an upcoming article.
Just to let you know, you can also define other shapes like
Circle,Ellipse... and even create your own shapes easily. Those shapes integrate seamlessly in SwiftUI, whereas with AppKit and UIKit, things would not have been that simple.
To see this new view, replace the line
window.contentView = NSHostingView(
	rootView: CatchPhraseView().padding(30)
)window.contentView = NSHostingView(
rootView: MainView().padding(30)
)
Interacting with the user
To let the user choose a color, we will use a popup button. This kind of button is very common in macOS controls, but also really easy to setup in SwiftUI. It belongs in SwiftUI to the group of "Pickers" as it allows to choose a single value among a group. Other buttons belong to that group, like the radio button, or the new segmented picker (macOS 10.15+).
When using a Picker, we have several choices to set its style. On macOS, the default style is PopUpButtonPickerStyle so we do not need to specify it.
To use a picker button is a bit different in SwiftUI as it would be in AppKit though. In SwiftUI, we declare a Picker with a label and values which the user can pick from - so here it's our colors array. Now you might be wondering: how are we supposed to pass the array to the picker? We are going to use the ForEach SwiftUI structure to build the values to be displayed in the picker. This structure can be instantiated with a range of integers, and for each integer, we have to provide the corresponding view. So here we will provide a Text view displaying the color name.
It might sounds strange though. Why can't we directly pass the array to the picker? That's how we could have done it in AppKit. But this method has one drawback: it allows only text to be displayed as the values. Other views like images can't be used easily. It might seem useless, but that is the philosophy of SwiftUI. Most often, it will not assume that it will receive a particular view, like text, or image... It will simply expect a View. This confers it a huge flexibility.
For example, we could decide to display a similar Rectangle view aside the text in the picker values to preview the color. (But I shall remain silent on that part, as it will be a challenge to take at the end of the tutorial if you want to train 🤫).
Here is what the picker looks like, followed by a break down.
// 1
Picker(selection: selectedColor, label: Text("Select a color")) {
    // 2
    ForEach(0..<colors.count) { index in
        // 3
        Text(colors[index].name)
    }
}- We define a
Pickerby providing it the variable that we should use to know what value is selected, as well as the view used for the label. So here it's aTextview. We then implement the views that the picker will use as its values. - The
ForEachstructure takes here a range of integers, and for each integer, the view we want to show. - To display the name of the color in the
colorsarray, we simply display aTextview. To get the color, we subscript the array with the current integer - namedvaluehere - provided byForEach.
You can now add this view between the body property opening curl bracket and Rectangle... and get two errors because the compiler is complaining. Bad! Bad compiler! And do not hope to avoid those errors if you run the script without Xcode as they will be returned too. So what's happening?
Let's tackle the first error. It should print something like
Function declares an opaque return type, but has no return statements in its body from which to infer an underlying typeWell well 🤔 That's not very intuitive.
Remember the
some View mentioned earlier? We face now what it does. It waits for a single type implementing
View to be returned. And here we return two types: a
Rectangle and a
Picker. So the compiler complains it cannot know which one to use. It's helping us in fact. Because how should those view be arranged? Should we align them vertically, horizontally, or else? There is no way SwiftUI can know that yet.
The solution is to wrap the two views inside another one, which purpose is to arrange views. Several views exist in SwiftUI which have that role. The
HStack helps us arrange views horizontally, whereas the
VStack is here to arrange views - you guessed it - vertically. There are also the
ZStack and
List and others but we will focus on the
HStack and
VStack views in this tutorial.
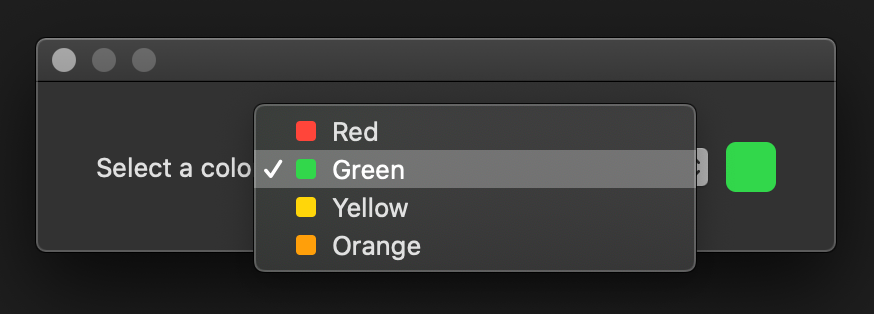
As a reminder, here is the layout we want to get.
HStack. And that's quite simple! All we have to do is to declare a
HStack at the right beginning of the views hierarchy inside the
body closure and put the two views inside it. Do note that the hierarchy is important. The views on top will appear at first on the left. Here it is.
var body: some View {
    HStack {
        Picker(selection: selectedColor, label: Text("Select a color")) {
            ForEach(0..<colors.count) { index in
                Text(colors[index].name)
            }
        }

        Rectangle()
            .fill(colors[selectedColor].value)
            .frame(width: 25, height: 25)
            .cornerRadius(5)
    }
}
Now SwiftUI knows that we want to display the Rectangle and Picker side by side. And we got rid of the first error. But perniciously, the second one on the Picker has changed and now displays two errors for one! 😱
One again, the message should help us. So what does it say?
Cannot convert value of type 'Int' to expected argument type 'Binding<SelectionValue>'Wait... what is a
Binding?
To be continued...
right now! But feel free to take a break, we are almost done. What a cliffhanger!
Wire up the color view and the picker
In the previous episode, the protagonist ended up on a really strange error, talking about Binding. Why would the Picker need something else than an Int variable to indicate the current selected color? Let's think about it.
The color picker is here to show a list of colors to the user, and then to let the rest of the code know somehow what color the user chose. Hmm. How is it supposed to that yet? We have not coded anything to really make that update. Where is the code to change the value of selectedColor after the user chose one color in the colors list?
This is where the magic of SwiftUI comes in and solves our problems. With AppKit or UIKit, we would have to code that logic ourselves. So, when the popup button would inform us that one color was selected, we would update the value of selectedColor, and after that we would have to make the Rectangle update because we changed the color.
But with SwiftUI, all we need to do is to declare that the variable selectedColor is a State variable. This means that it has an impact on the view. By marking the variable as a State one, we indicate to SwiftUI that each times its value changes, it has to update the views. And we have nothing else to do!
So please replace the line
var selectedColor = 0@State private var selectedColor = 0 The @State is the syntax to mark a variable as a State view. Also, although it is not required to mark the variable as private, it is strongly recommended to do so to avoid another piece of code to play with it, and enforces the fact that this variable should be only known by the view which owns it.
Now that the variable is a State one, we can simply use this information to silent the error in the Picker. This is done by prefixing the variable name with a $ sign. Understanding this is beyond the scope of this tutorial because it deals with property wrappers (this topic should be addressed in an upcoming tutorial though). All you need to know yet is that @State is a property wrapper, and that behind the scene, a property wrapper adds some logic to a property - here selectedColor - in an invisible way so that we can still use the property normally. But sometimes SwiftUI needs us to clearly pass the property wrapper behind a property.
That's the case here: the Picker wants the information of the property wrapper, which is here called a Binding. So please replace the line
Picker(selection: selectedColor, label: Text("Select a color")) {Picker(selection: $selectedColor, label: Text("Select a color")) { And now, finally! You can execute your script and see the interface adapting to your color choice. Here is the final implementation of MainView
struct MainView: View {

    @State private var selectedColor = 0

    var body: some View {
        HStack {
            Picker(selection: $selectedColor, label: Text("Select a color")) {
                ForEach(0..<colors.count) { index in
                    Text(colors[index].name)
                }
            }

            Rectangle()
                .fill(colors[selectedColor].value)
                .frame(width: 25, height: 25)
                .cornerRadius(5)
        }
    }
}main.swift file, rename it and change its execution rights. You can then execute it.
mv main.swift color-picker.swift
chmod +x color-picker.swift
./color-picker.swift
Summary
What a long road! I know it can be hard, especially if you are new to Swift and/or SwiftUI. Coding interfaces is not something that comes easily, even though SwiftUI has huge benefits to make this process simpler. But I think it's worth it. Imagine that tomorrow you could prompt a nice interface to the user to ask them to fill in information, or a welcome message with specific instructions to a user or technician who boots up a Mac.
Also, it was fairly easy to code that interface when compared to the AppKit version (you can checkout the AppKit script to be convinced of it). That said, it does not mean that AppKit or UIKit should now be left behind. SwiftUI is young and brings new and exciting features. But you know how young people are these days... They want to change everything so fast 👴 It's a powerful API, but I would not recommended to use it in your overall project or application today, especially on macOS. It's a perfect candidate to easily and rapidly build simple interfaces in scripts, though.
Finally, should you decide to start an application, I would advice you to not reuse directly what you wrote in a script. In an app, you can - and should - split your code into separate files, so that it's more organised and easier to maintain. This tutorial explains how to script with SwiftUI, and I wrote it because I think it can be useful to do that. But to code with SwiftUI in an app, you can find more appropriate content like the 100 days of SwiftUI by Paul Hudson, SwiftUI: Getting Started on Ray Wenderlich, and many other websites.
Challenge
I told you there was going to be a challenge at the end! If you like to practice, here it is.
Remember when I said that you could use something else than text in the Picker view? What I would like ask you is to display the color at the left of the text in the list:
- You should use a stack view
- You can reuse the
Rectangleview, but you should change its frame and corner radius values
Going further
SwiftUI views composition
I did not address the composition of SwiftUI views in this tutorial, in case you know about it. This is a principle stating that we should try to split large views into smaller ones. And here we could have typically done that by implementing aColorView and a
ColorPickerView. But I think it is quite long already, and we will definitely dive into this topic in further tutorials.
Contact
This tutorial should be the first of a series that I will flesh out. Thank you for reading it! If you enjoyed this content, and want to read more, don't hesitate to share this tutorial on Twitter, or any other social network I'm in. Also, feel free to send me an email if you have a question or need some help. Alternatively, you can find me on the Mac admin slack channel (Alexis Bridoux: @Woody) or on Reddit.Spread the word! ✌️