
Cocoa: implement a privileged Helper
Tutorial4 September 2020
Special thanks
I would like to thank Thijs Xhaflaire, Bob Gendler and Armin Briegel (Scripting OSX) for their useful feedback and review. Tanks also to Alexander Momchilov for his insightful feedback.
Deprecation (31st December, 2023)
Starting from macOS 13, a new method using SMAppService should be preferred. I haven't had the time to look into it. But the code for this tutorial was updated to use SwiftUI and the new structured concurrency features in Swift. Also, the pointers management has been fixed. The code in the materials is up to date for Xcode 15. The materials now only contain the final version of the project.
The python script used to sign the helper cannot be executed with Python 3.11.5 since it was written for Python 2.7.0 which is now deprecated. Although I fixed the script in the materials which can be interpreted with Python 3.11.5.
I'll try to use the new SMAppService if I find the time!
Exposition
Introduction
First of all, I wanted to say that I am not a macOS expert, neither a security professional. I may talk about things I do not entirely master in this tutorial. But I was able to make a privileged helper tool to work and I wanted to share the method I use in case someone would need it. There is not much documentation available online, and it is sometimes hard to have a full theory and practical usage example. I will especially try to give you a practical example, while instilling the theory along the way.
At the end of this tutorial, you should be able to write a privileged helper tool to execute actions with the root privileges, and decide whether to install it from your application or separately with a script.
Regarding the plan, the 1st part gives you an overview of the project files. The 2nd tries to cover the required theory around XPC services. The implementation will start at the 3rd part, but if you are only interested in the Helper signature setup, you should go directly to the 4th part. If you do so, you'll find the project with all the code written in the 3rd part in the Scriptex (code final) folder so that you can jump on the bandwagon.
Without further ado, let’s begin.
Scriptex
You can find a starter folder in the repository materials (you can download the overall materials as a zip file). This folder contains a Xcode project named Scriptex. This is the one we are going to work with in this tutorial. Its purpose is to execute scripts for the user. Note that the script execution is just a simple example to use when building a privileged helper. But you might want to use it in production with further protection (like allowing scripts only in secure folders) to avoid malicious attacks.
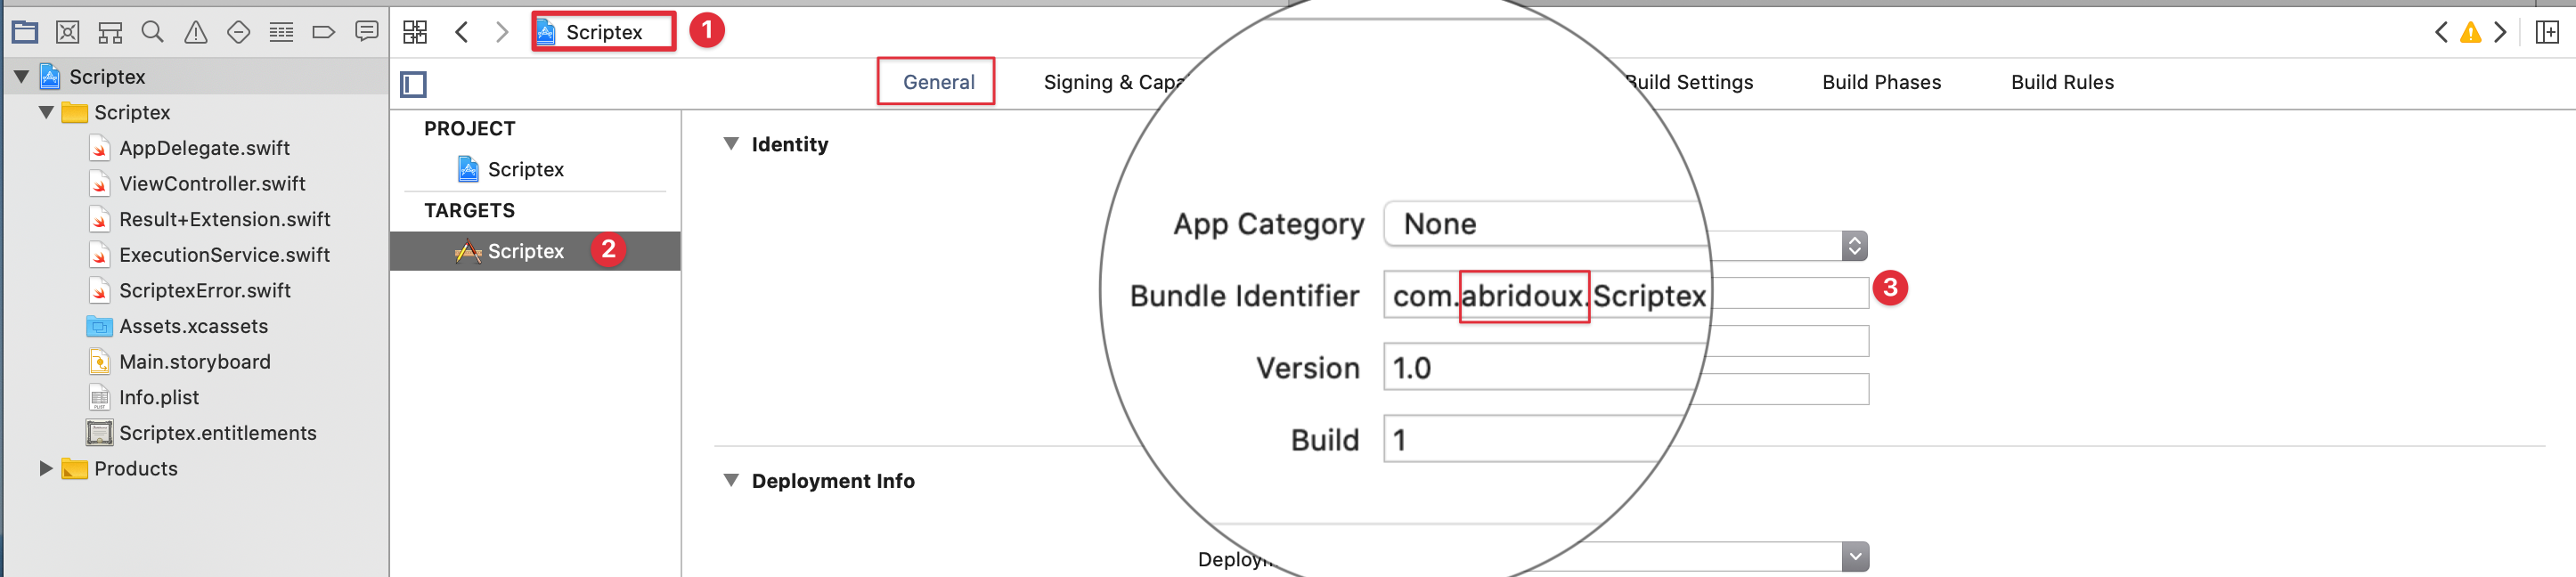
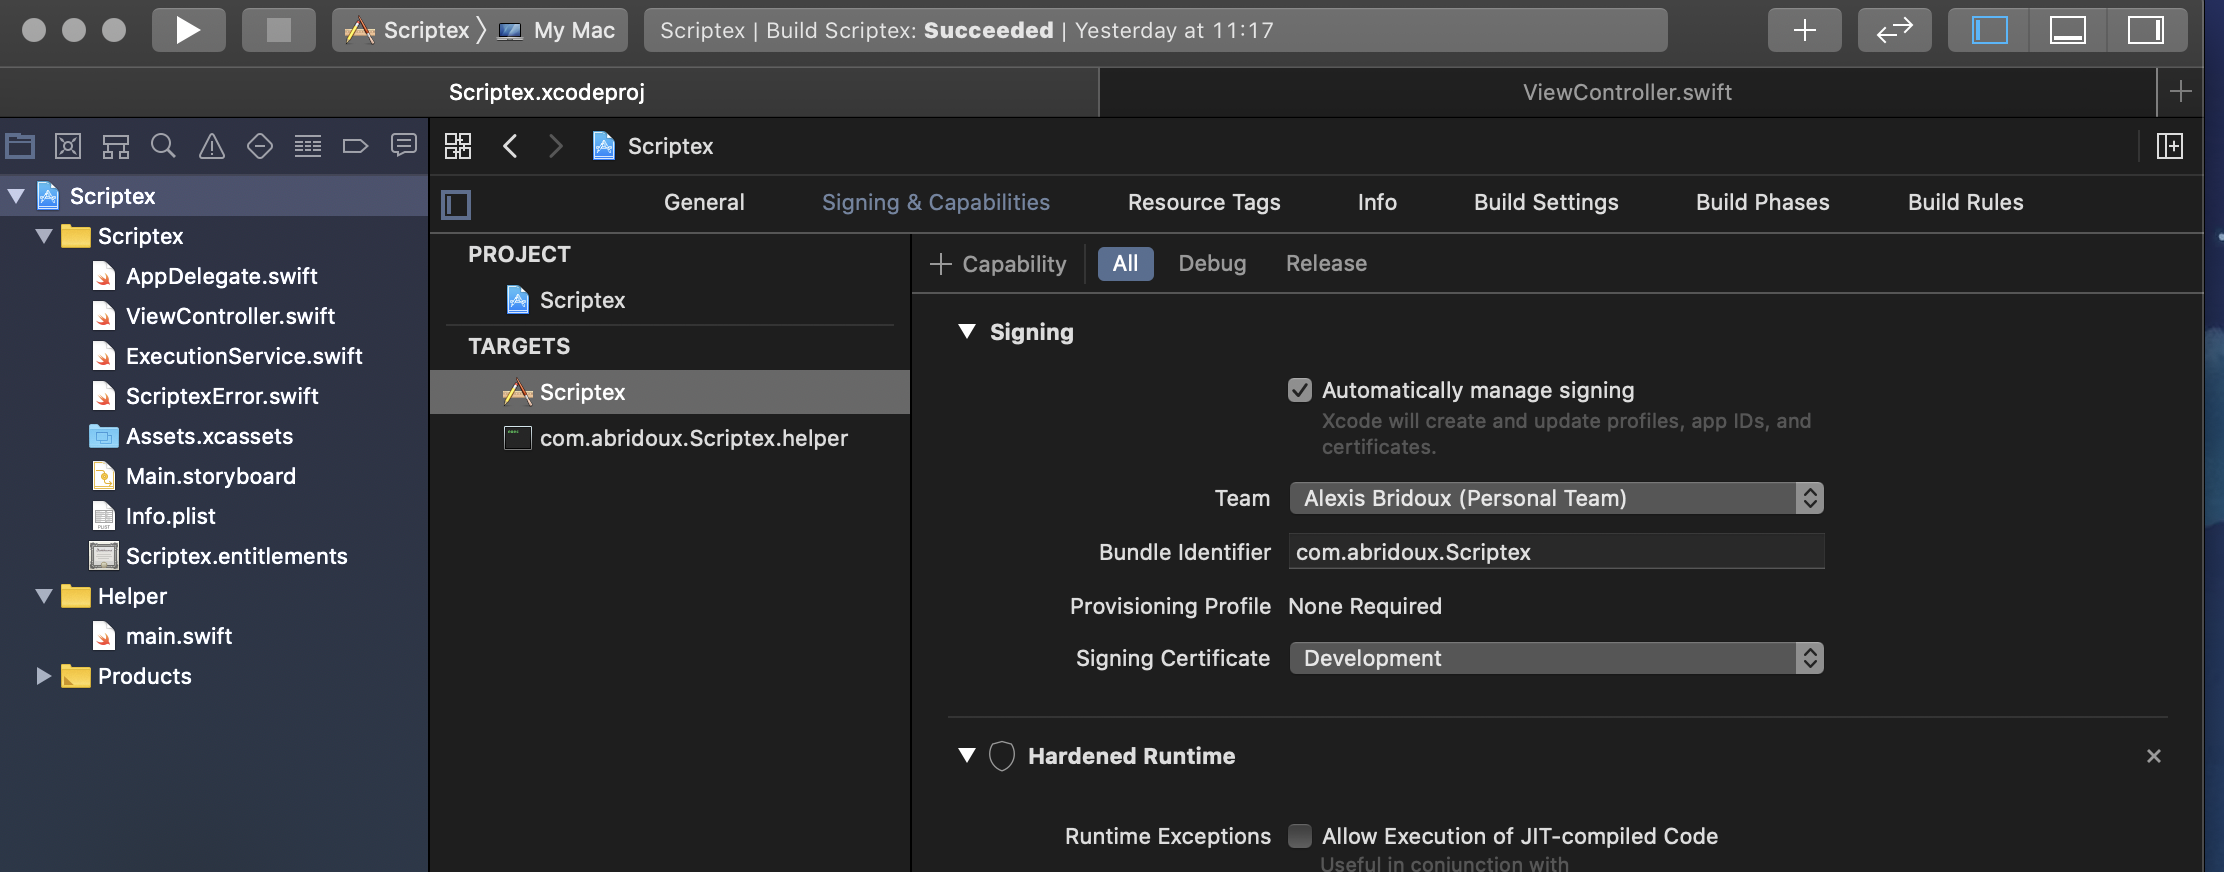
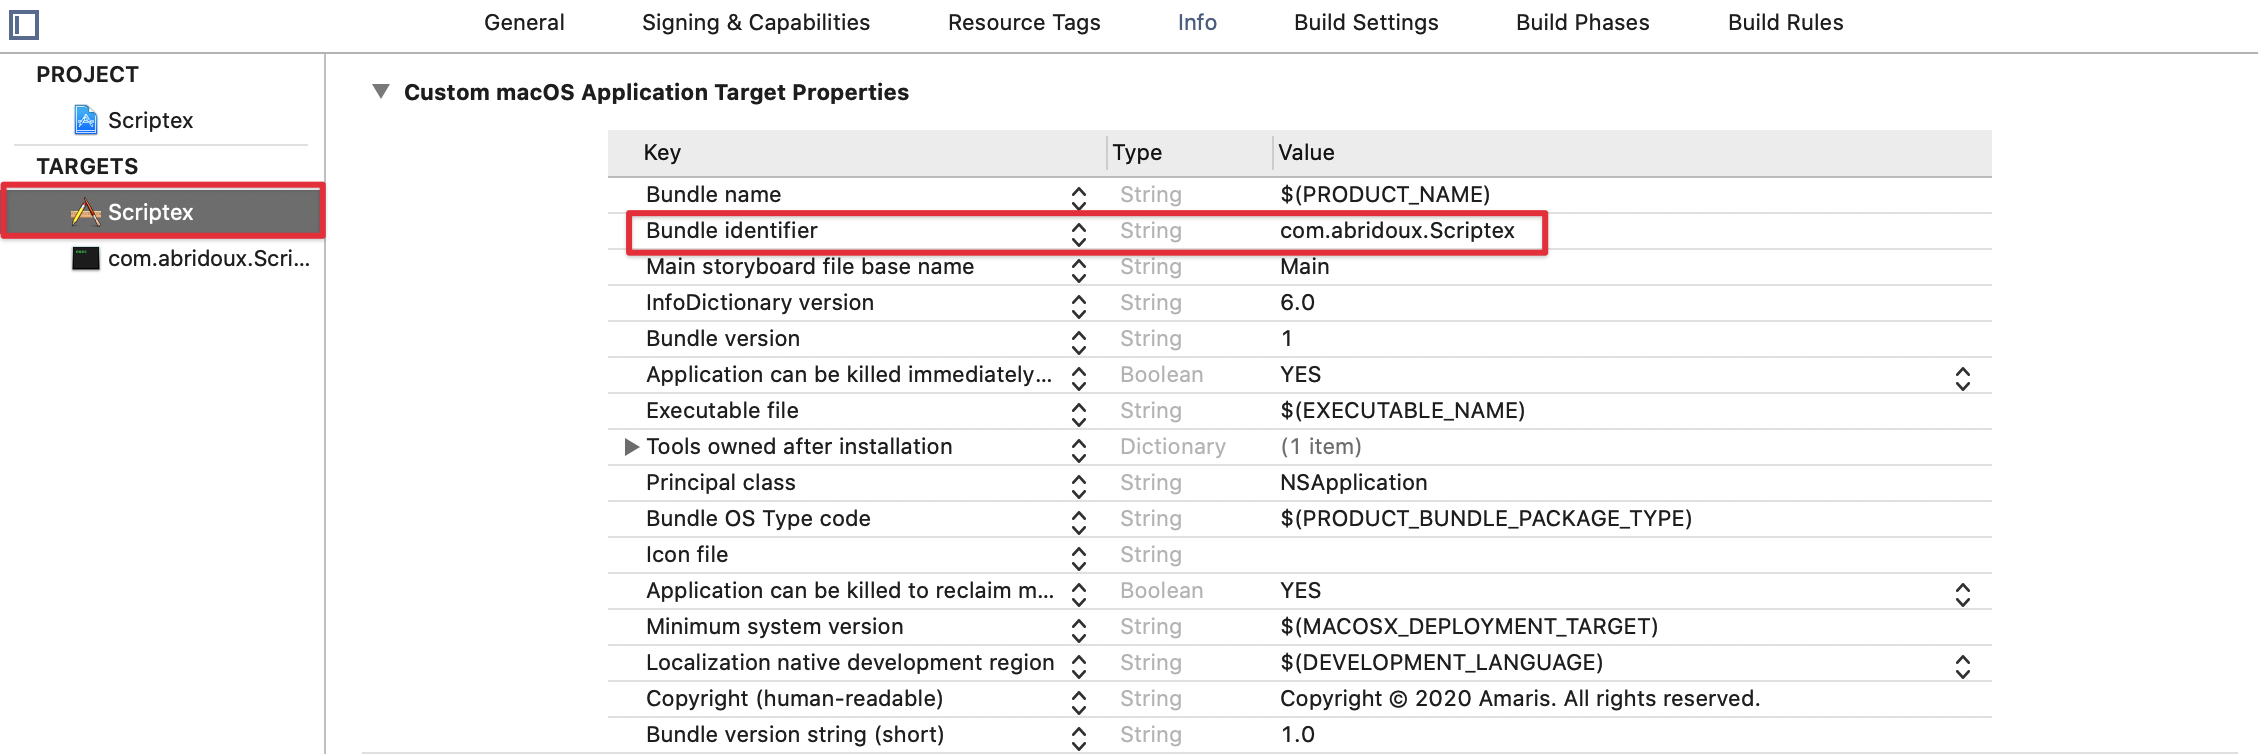
Before I give an overview of the project files, you might want to run the app. To do so, navigate to the targets General tab and make sure to change the Scriptex bundle identifier by replacing the abridoux part to your company/name.
Then, go the Signing and capabilities tab to change the signing to your team and bundle identifier
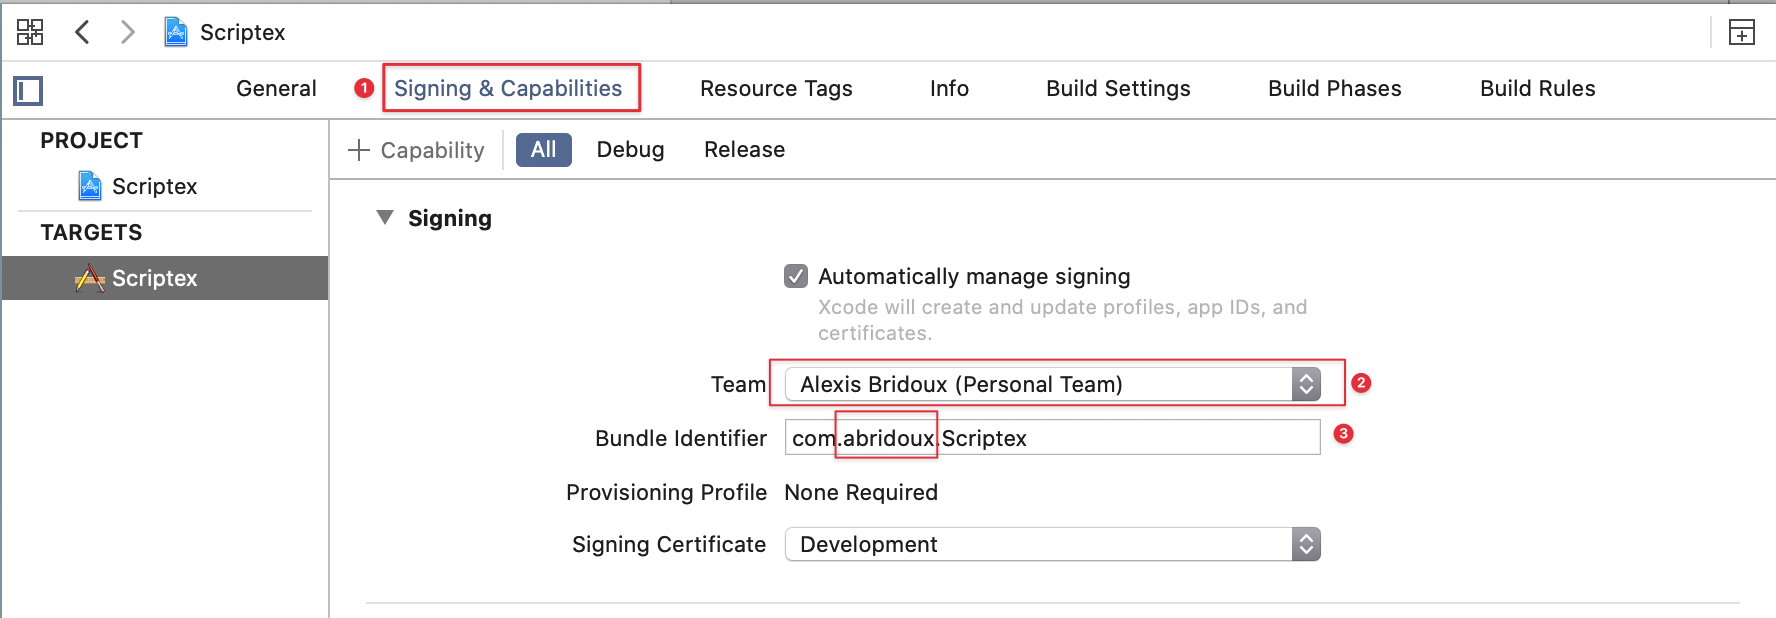
You should be able to run the app now.
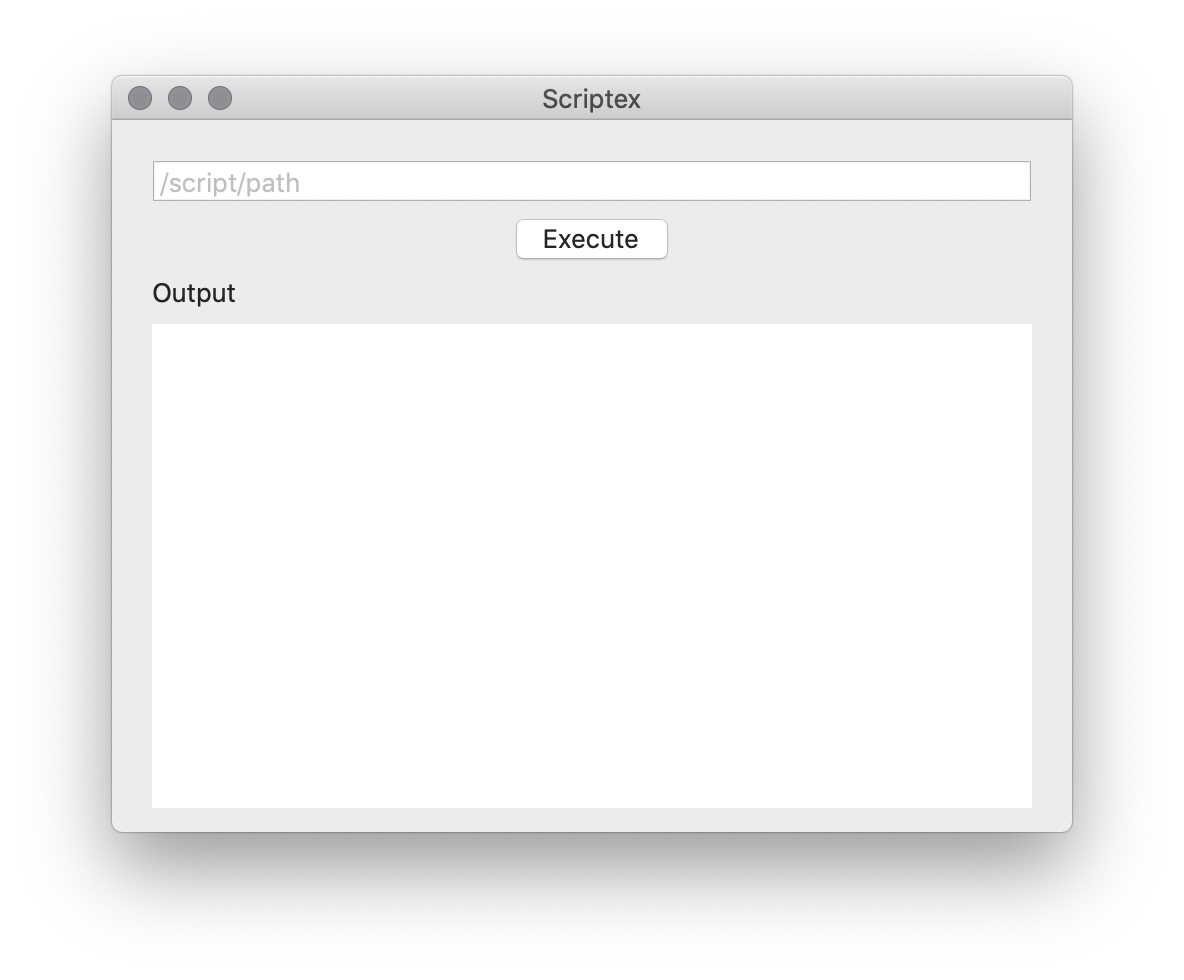
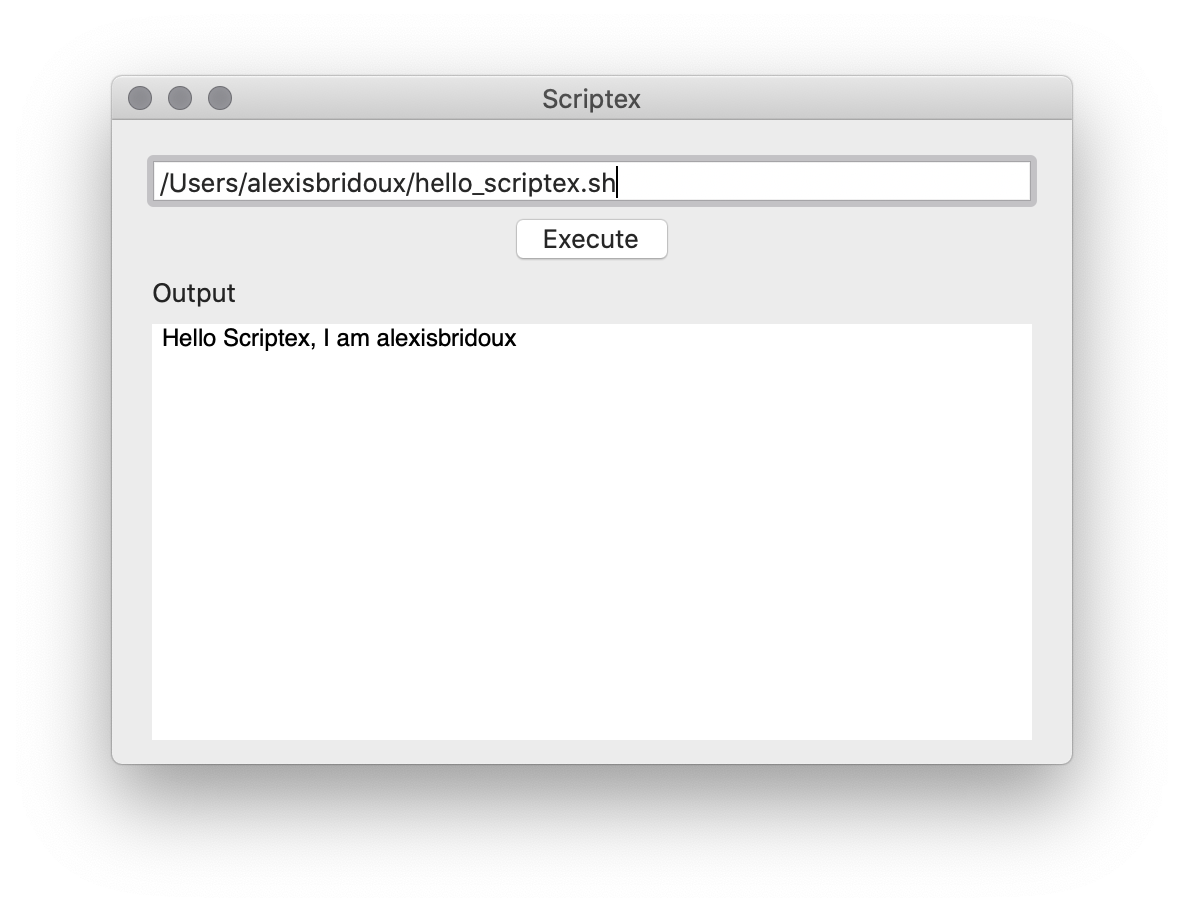
If you write an absolute path to a script, or drag and drop a script file in the text field, you can execute it by pressing Enter or clicking the ”Execute” button. In the materials Scripts folder, you can find a hello_scriptex.sh script which will display a message using whoami command.
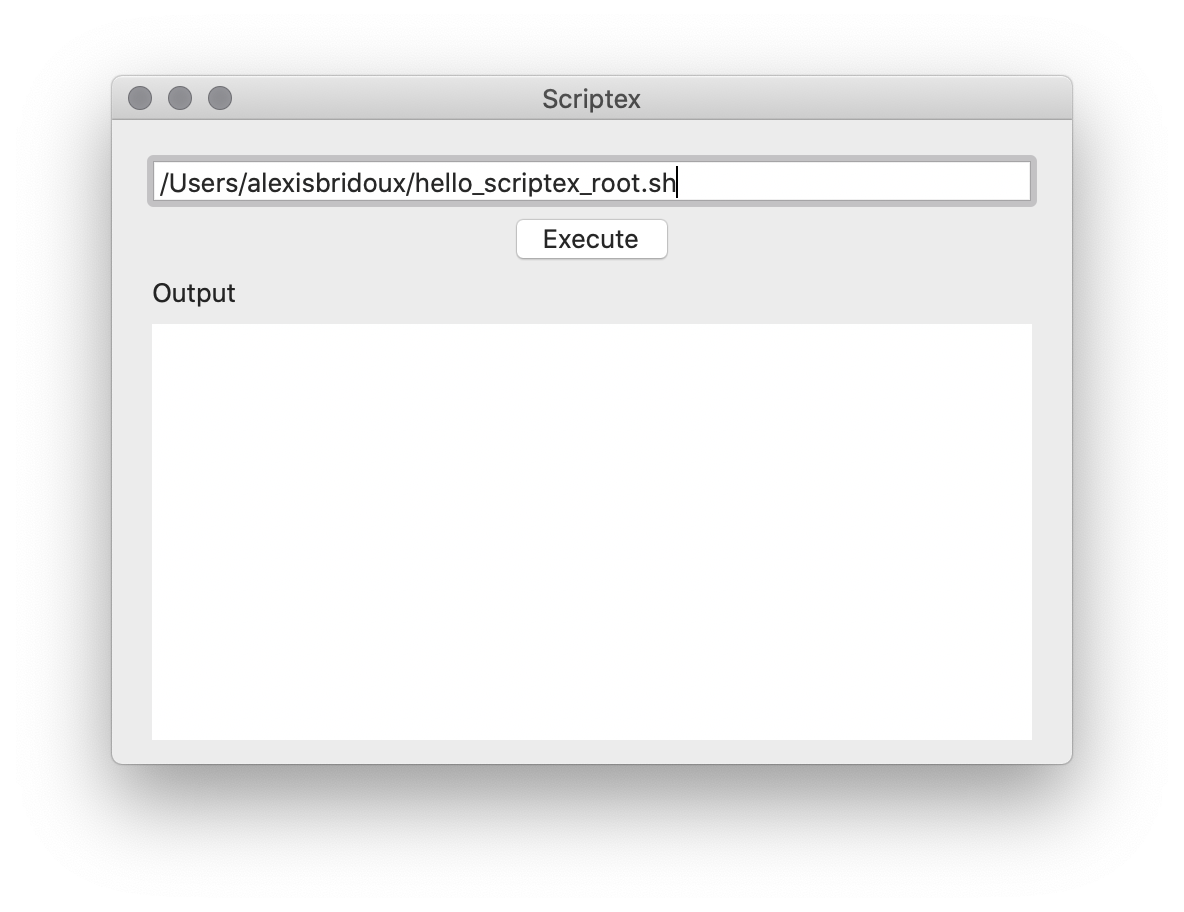
In this tutorial, the goal is to execute a script which can only be executed with the root privileges. In the materials Scripts folder again, you can find a hello_scriptex_root.sh file, which can only be read, written and executed by the root. If you try to execute it with Scriptex, here is what you will get.
If the script is executable by everyone, you might have to make it so:
chown root hello_scriptex_root.sh
chmod 744 hello_scriptex_root.sh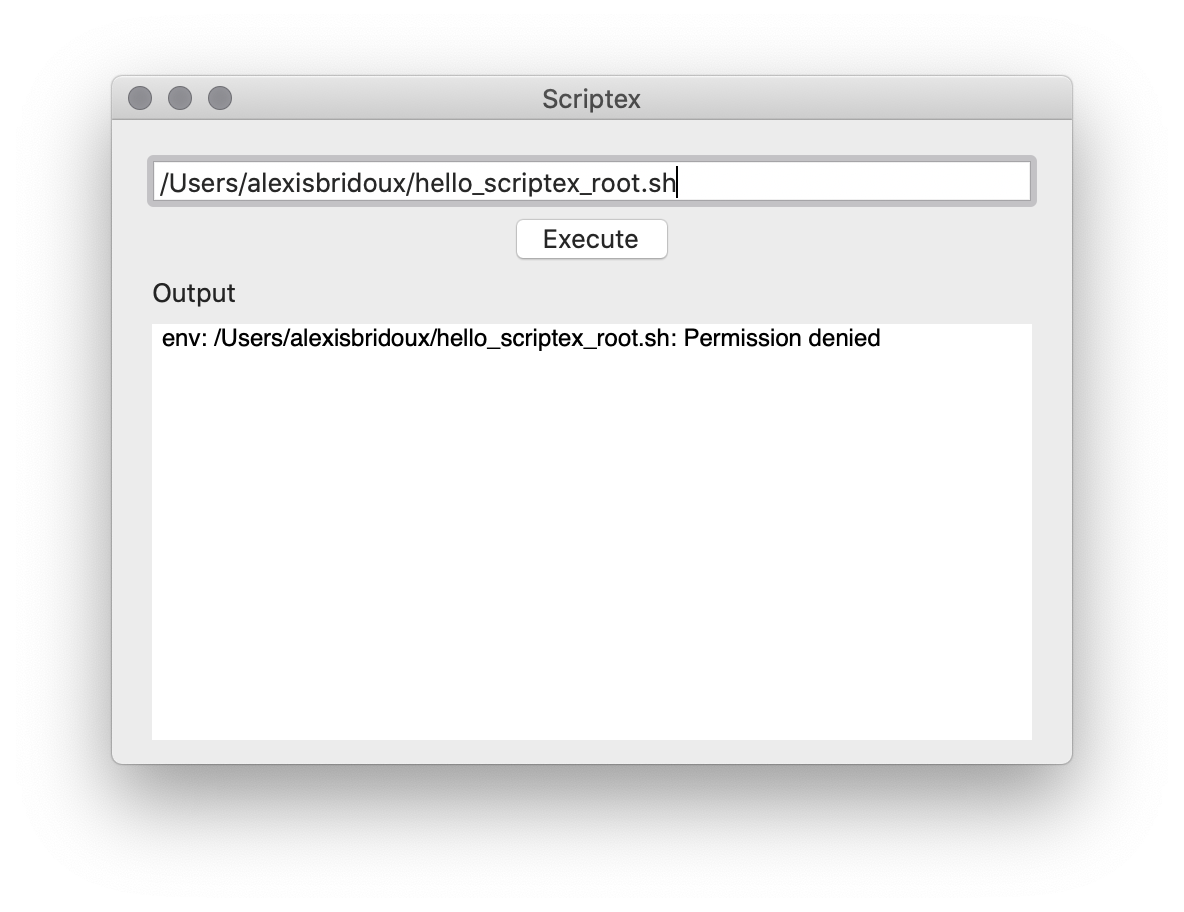
Note: You can launch the app with root privileges by executing the following command.
sudo path/to/the/app/folder/Scriptex.app/Contents/MacOS/ScriptexAnd boom, you do not need a privileged helper.
End of the tutorial.
But
This is not recommended at all!
As explained in Apple documentation, an attacker could use your application to run malicious code with root privileges. This could obviously lead to security faults. Even if your app does not execute scripts (or even bash commands) as Scriptex does, there are still chances that the attacker can gain some control of the system, or degrade it. Thus, an application should never be ran with the root privileges.
Do not worry though, this is the purpose of the privileged helper tools, and we are about to write one!
Scriptex files overview
Except for the classic files for a Cocoa application, you can find three files in the project.
ExecutionService
ExecutionService holds the code to execute script. If you open it, you will see it launches a process to execute the script in a Task (thus in the cooperative thread pool). The function throws if running the process fails. Also you can observe that both the output and execution errors are sent as the output:
process.standardOutput = outputPipe
process.standardError = outputPipe
This is simpler for this tutorial, but you might want to throw an error rather than outputting it in another project. This is the reason you can read the ”Permission denied” message when executing the restricted script. In the file ViewController, we setup the interface actions to execute the script the ExecutionService.
ScriptexErrors
The file ScriptexErrors contains the possible errors which can be thrown in this project.
ContentView
In this view, the subviews are setup to offer to execute a script. The onDrop modifier allows to easily drop a file to read its URL in the text field.
Pretty simple project yet, right? 😊
Now, let’s take it to the moon!
XPC services
Theory
But before the moon, let’s dive in the theory a bit. You would not want the ship to crash, would you?
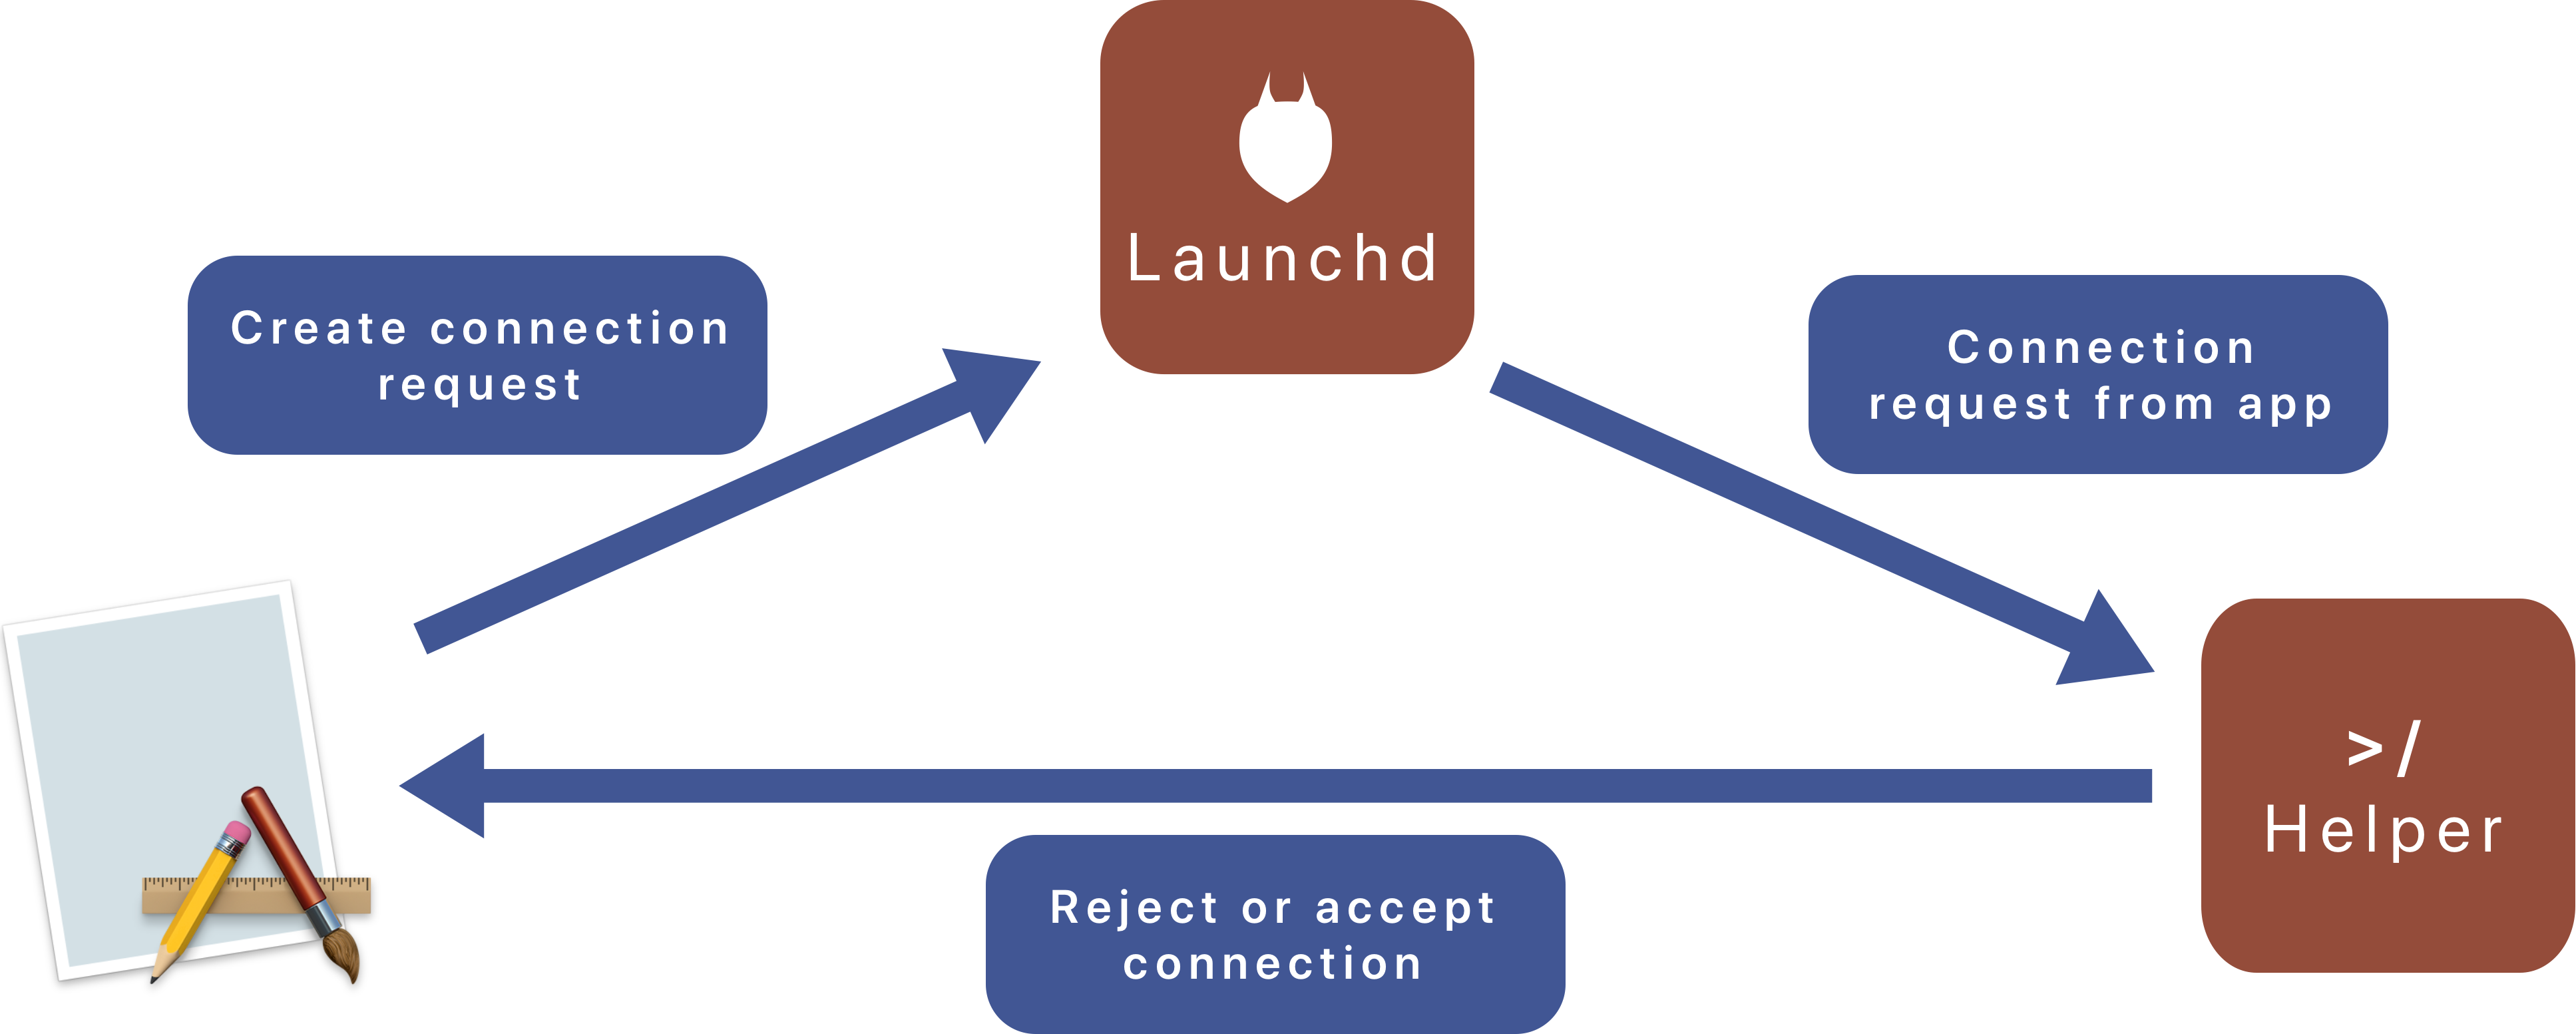
When you install a Helper, the application will not access to it directly, even if it is the one which installed it. It will rather ask a daemon identified by a specific identifier MACH service and running in background to create a connection with the Helper. Then the daemon will forward the connection request to the Helper. It is up to the Helper to decide whether to accept a connection or not depending on its attributes. This part will be on our own.
On the other hand, a Helper will automatically reject connections that do not authenticate with the correct signature. This is an important part - as we will see - to sign both the app and the Helper with the same certificate. After that, the Helper will only accept connection from app signed with the same certificate. This means that if you change your production certificate, you will have to install again the Helper, with the updated signature.
Once the Helper accepted the connection with the application, it is almost transparent from the app point of view, and we will be able to execute code through a helper protocol as if it was a part of the app.
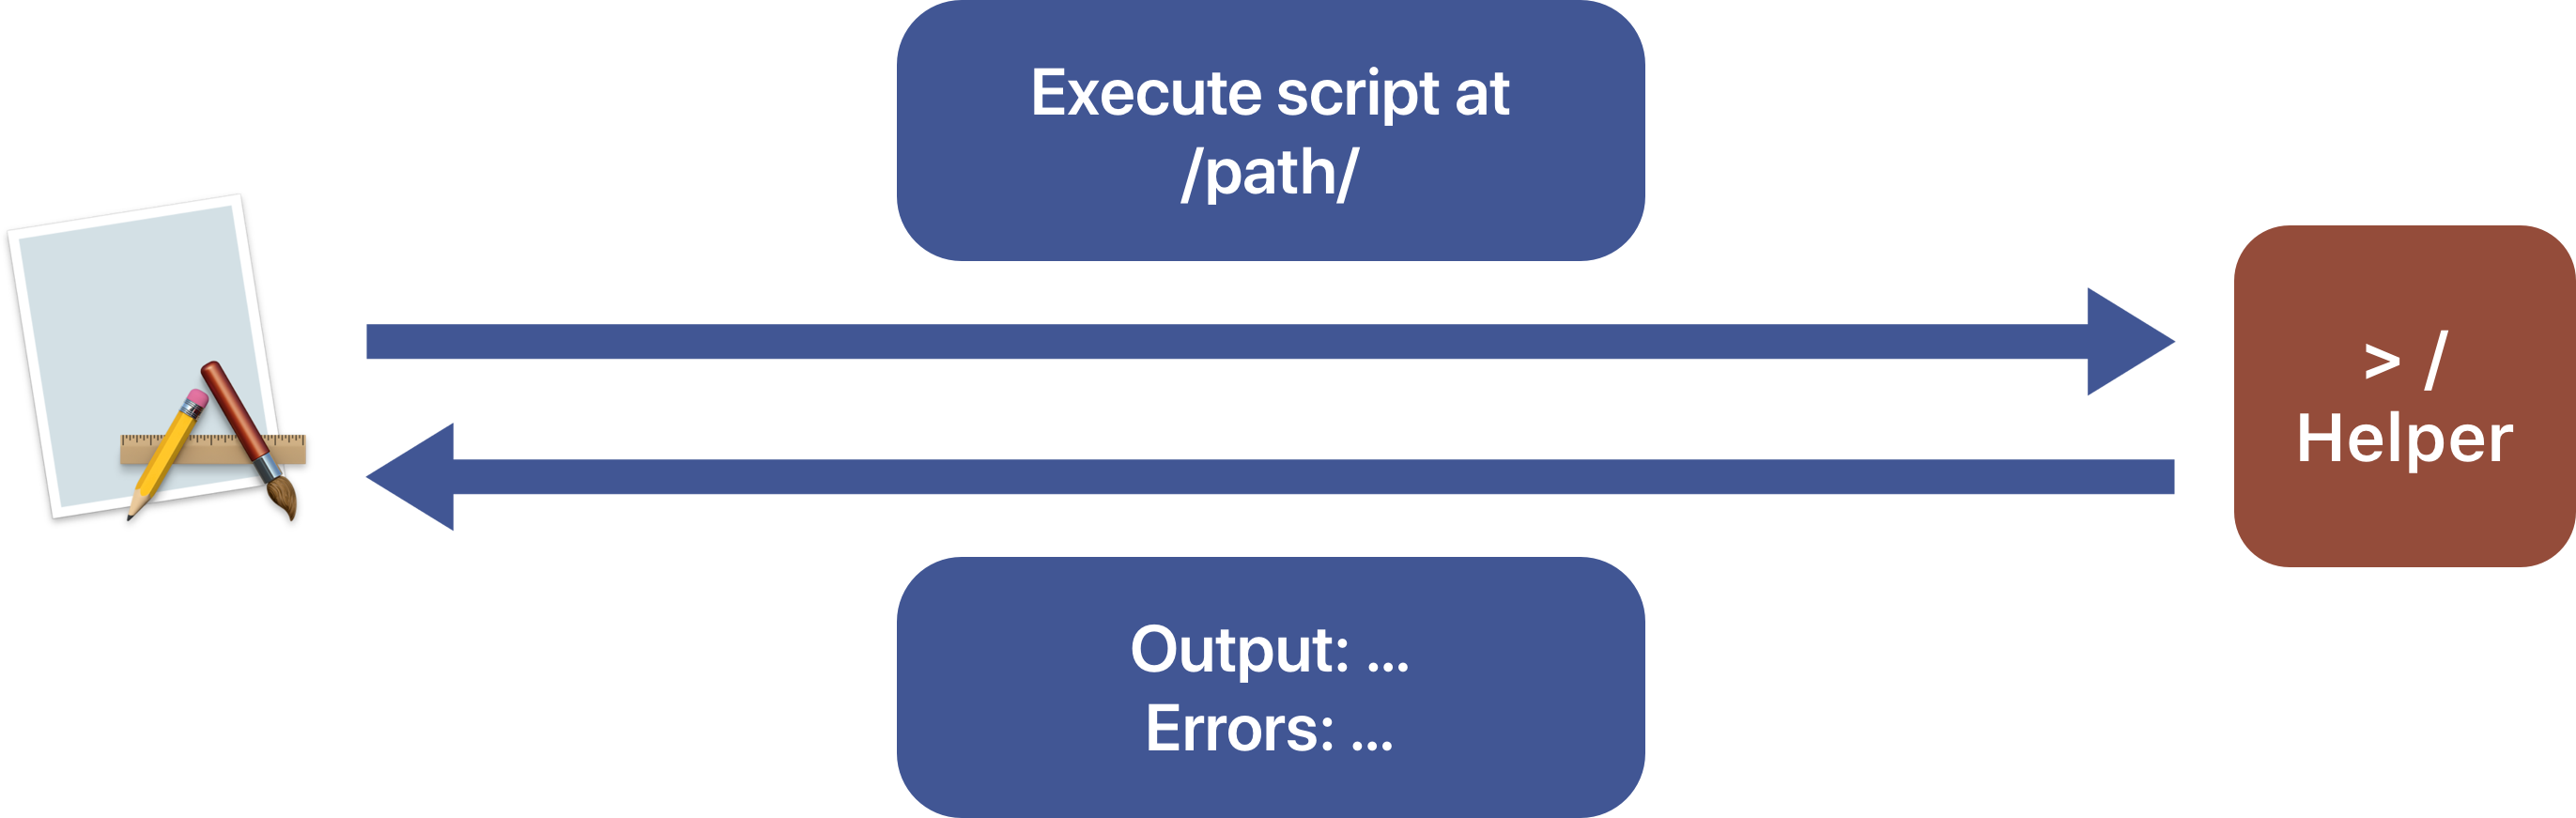
From the Helper point of view, the app communicates through a remote protocol. This protocols communication ensures that the required functions or variables will be found when the connection is established. Thus we will have to ensure that both components implement the protocol they are required to.
Protocols
Those protocols will be named HelperProtocol - implemented by the Helper - and RemoteApplicationProtocol - implemented by the app. The HelperProtocol will require a function to execute a script at a path, as well as a completion handler to execute when the script has executed. We will keep the ExecutionService functions while moving to the Helper target. Thus, the script execution will still be asynchronous. I prefer this solution as it allows the Helper to be reactive if the remote app makes several requests at the same time. This way, the Helper can handle request and dispatch them onto a separate thread.
The RemoteApplicationProtocol will have no requirements, as everything is already handled by the HelperProtocol.
We could have use this RemoteApplicationProtocol to require a function to execute with the result of the script. Thus, the Helper would call this function when the script has been executed. But it means to find a way to store the connections to know which script output should be sent to which connection. This is a possible solution but let’s try to keep things simple for this tutorial.
Alright! Enough theory, time to practice! Please open the Scriptex project and let’s start coding.
Helper implementation
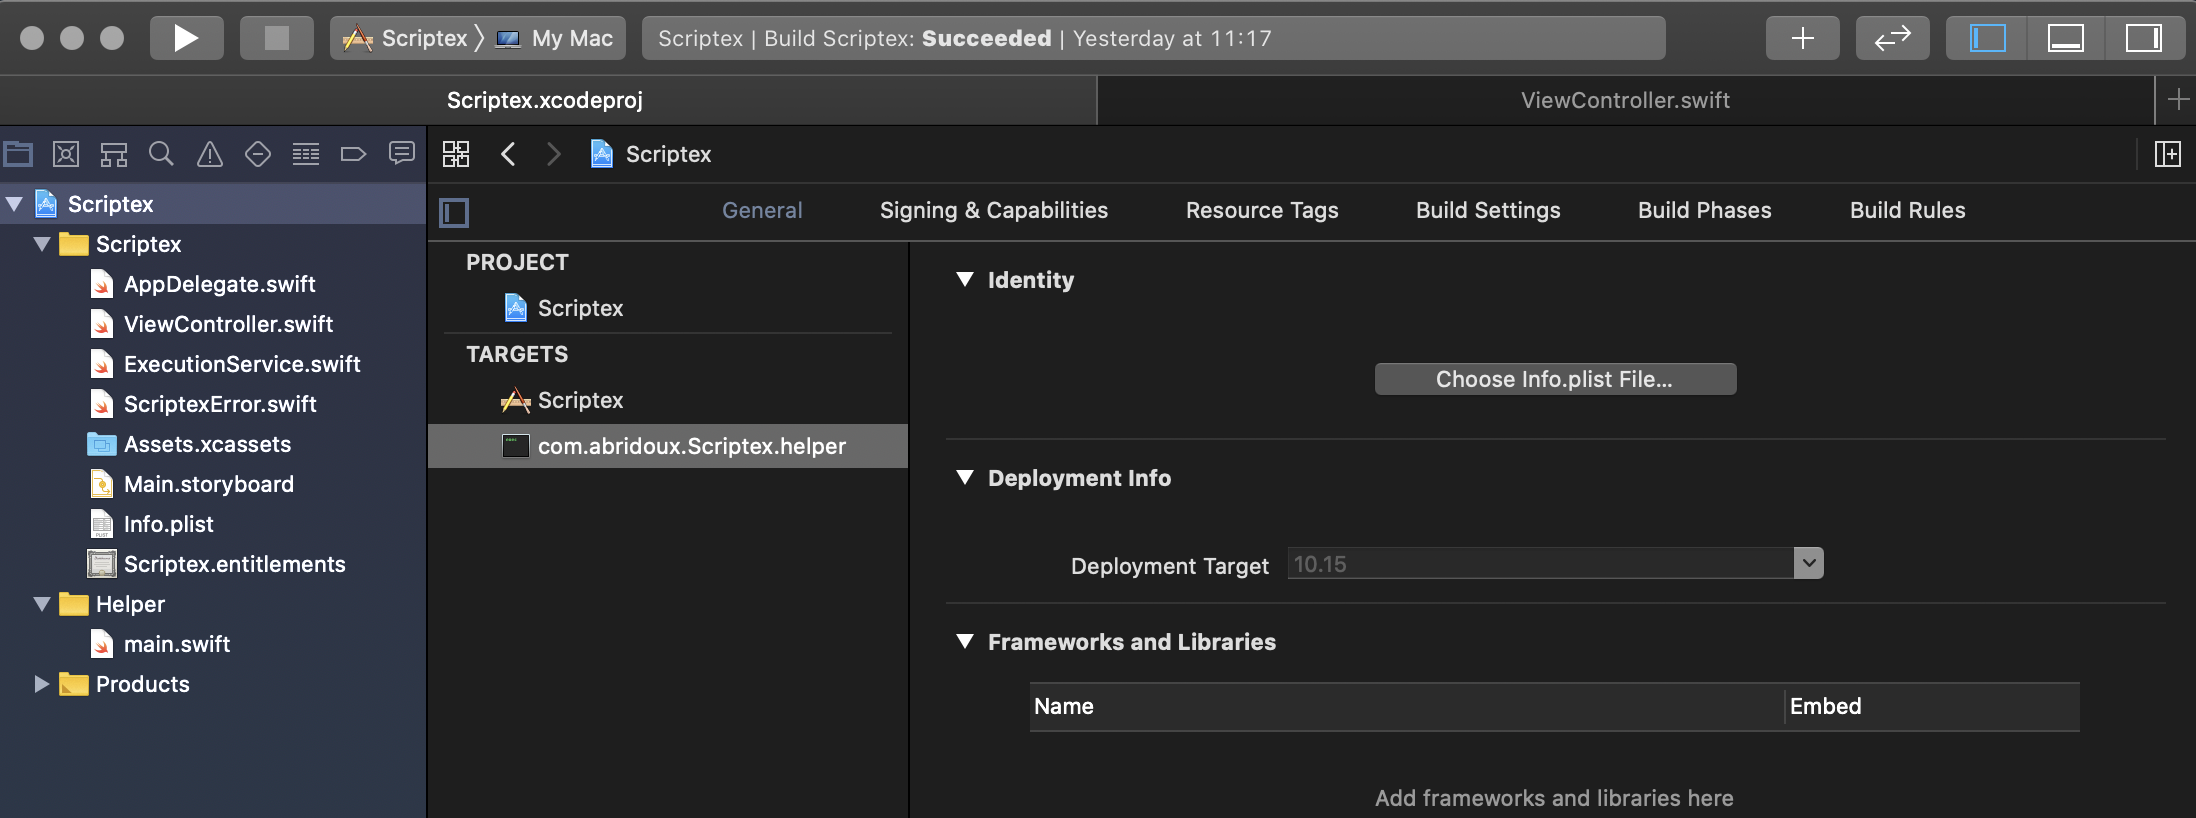
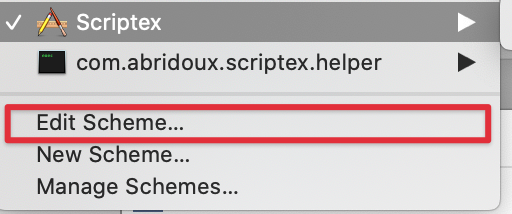
The Helper is a separate program so we have to create a new target in our project to host. Create a new target.

Now choose the macOS Command Line Tool template. Name it Helper for now. Once the target is created, please move to the project view and change the name of the created target from ”Helper” to ”com.your-company.Scriptex.helper” (the project creation does not allow to use dots so we have to rename it here).
For the company name part, you have to write the company name corresponding to your certificate. It should be the same as the one used to sign the app:
For me it is ”abridoux” but it can be the name of your company like ”acme”.
If you open the ”Helper” folder, you can notice the file main.swift which is created by Xcode when we choose the Command Line Tool template. Keep it here now, we will come back to it soon.
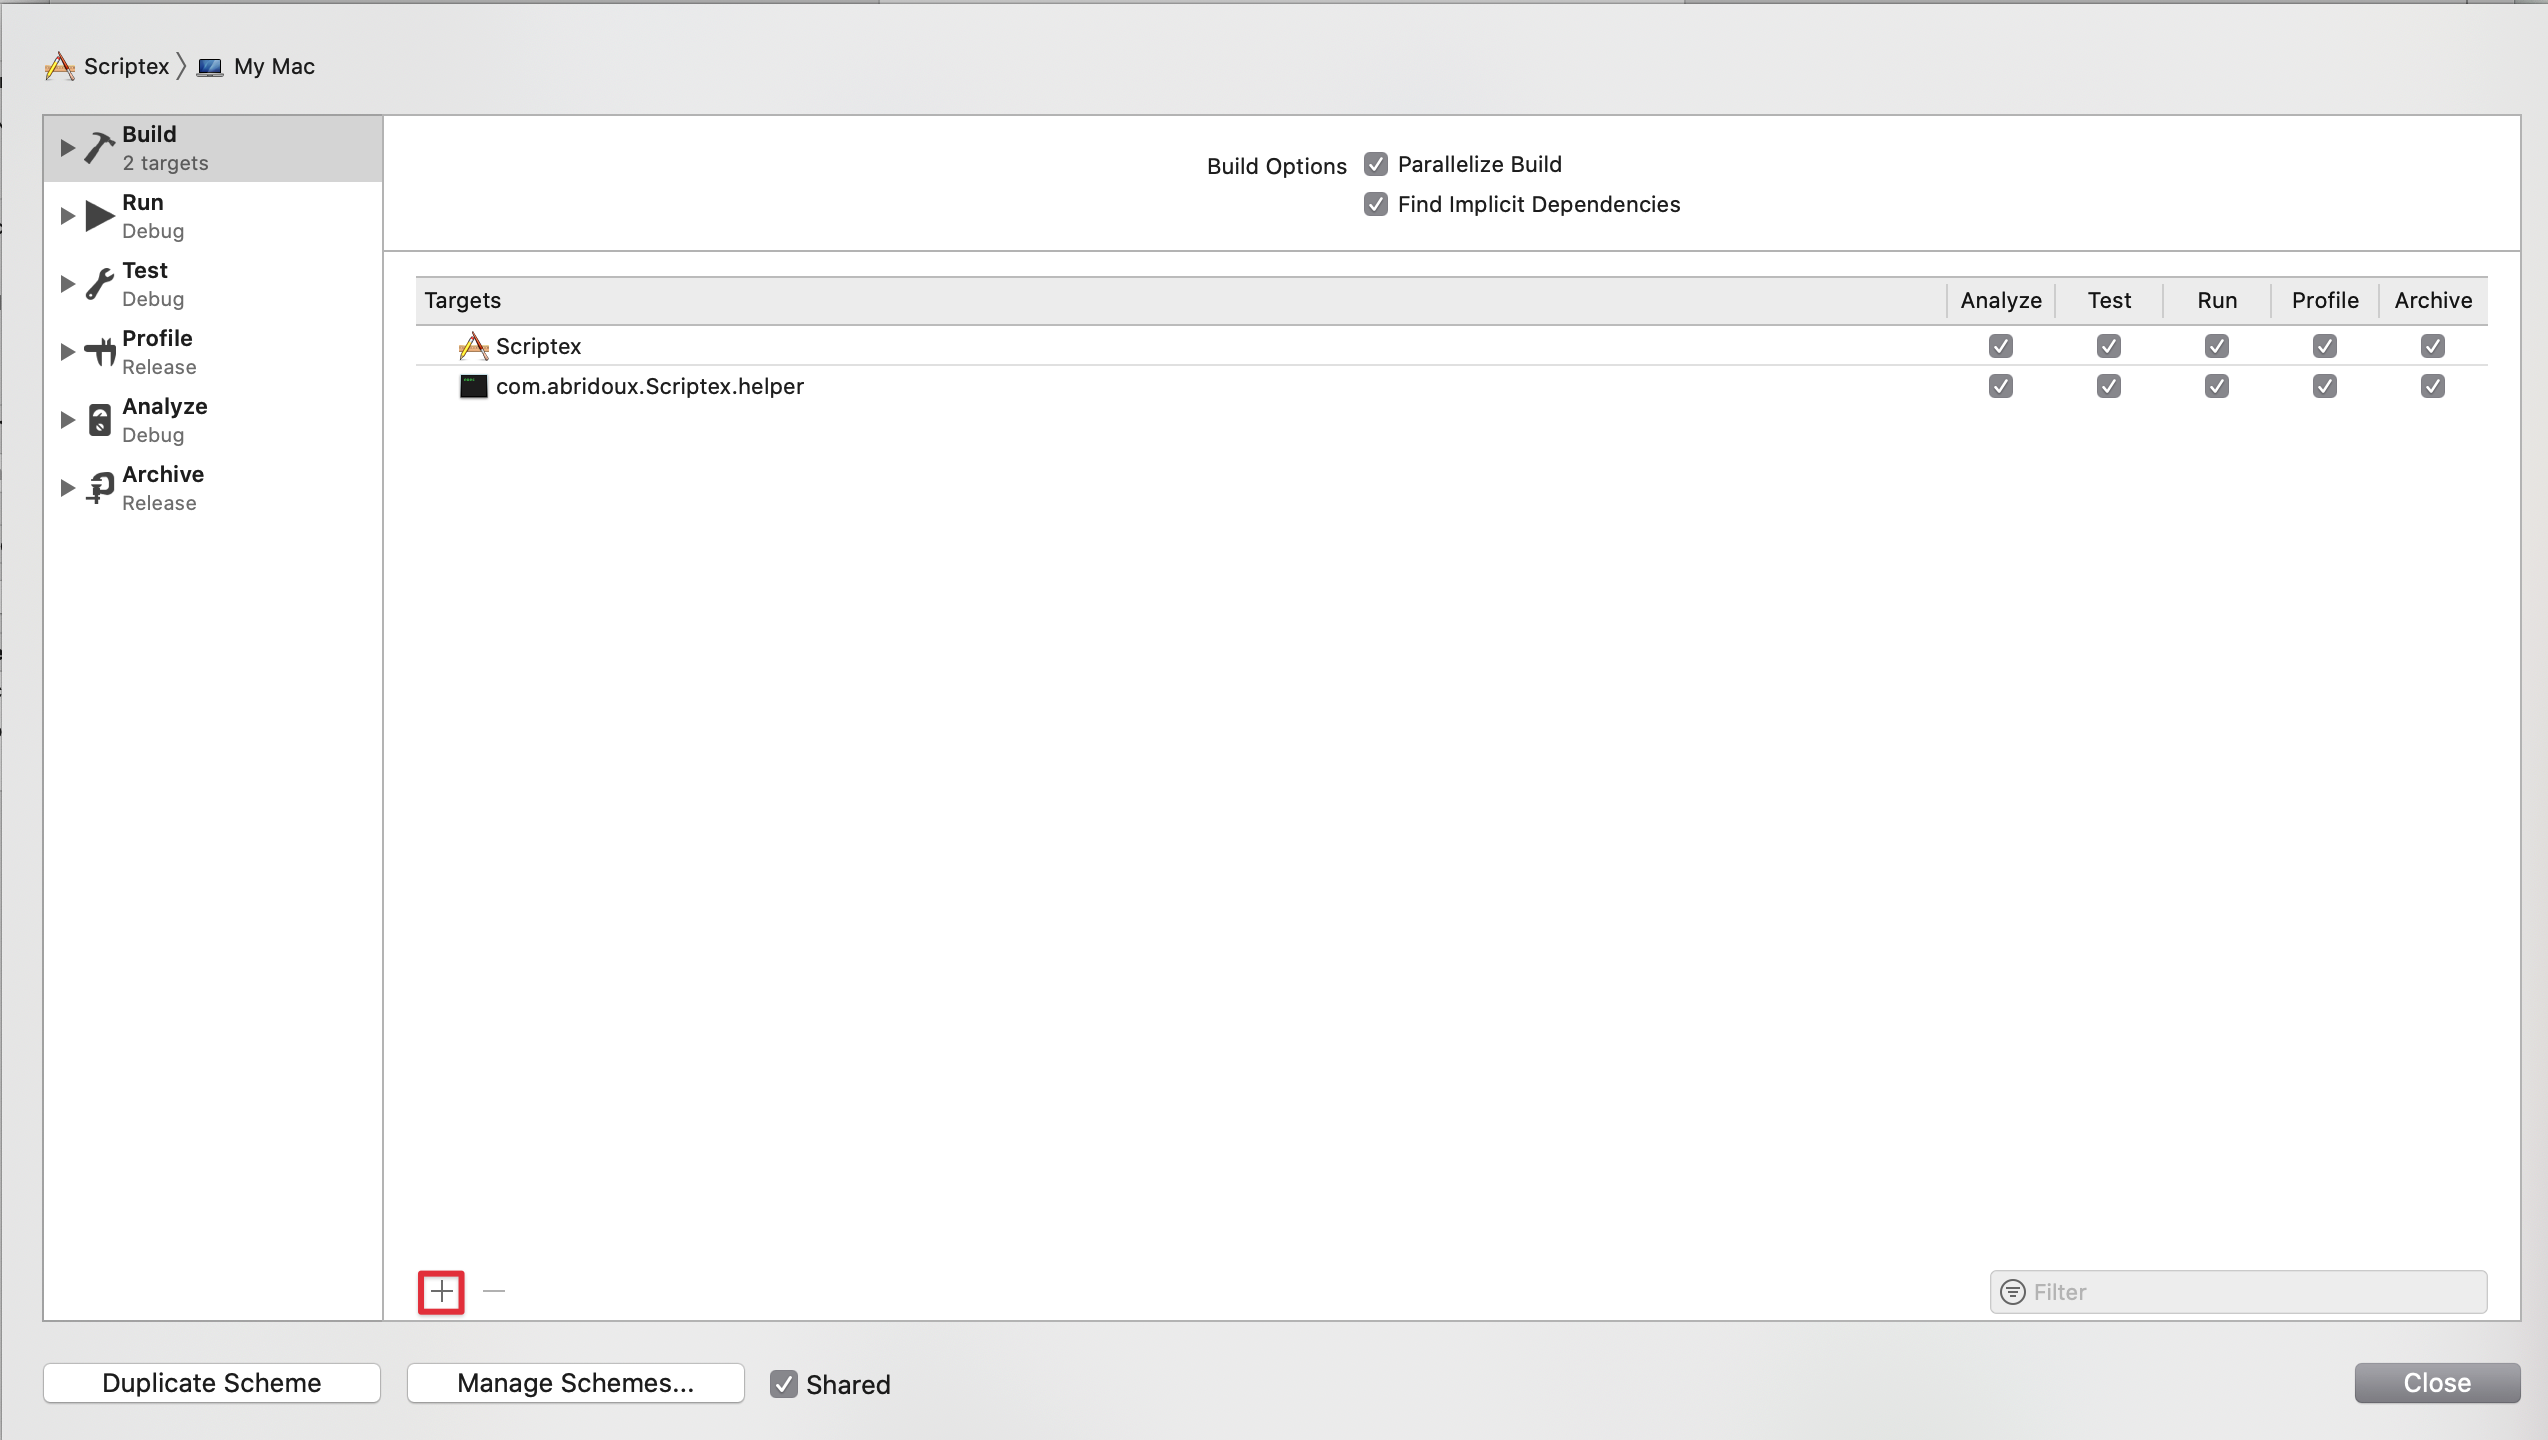
As long as we are here, please add the Helper target in the Scriptex scheme so that both targets will be built when with the project.
Then
Finally, make sure to set the target of the file ScriptexError.swift to both the two targets Scriptex and com.your-company.Scriptex.helper:
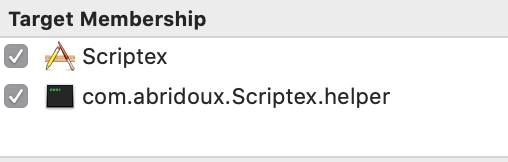
This will be easier to write the rest of the code.
XPC protocols
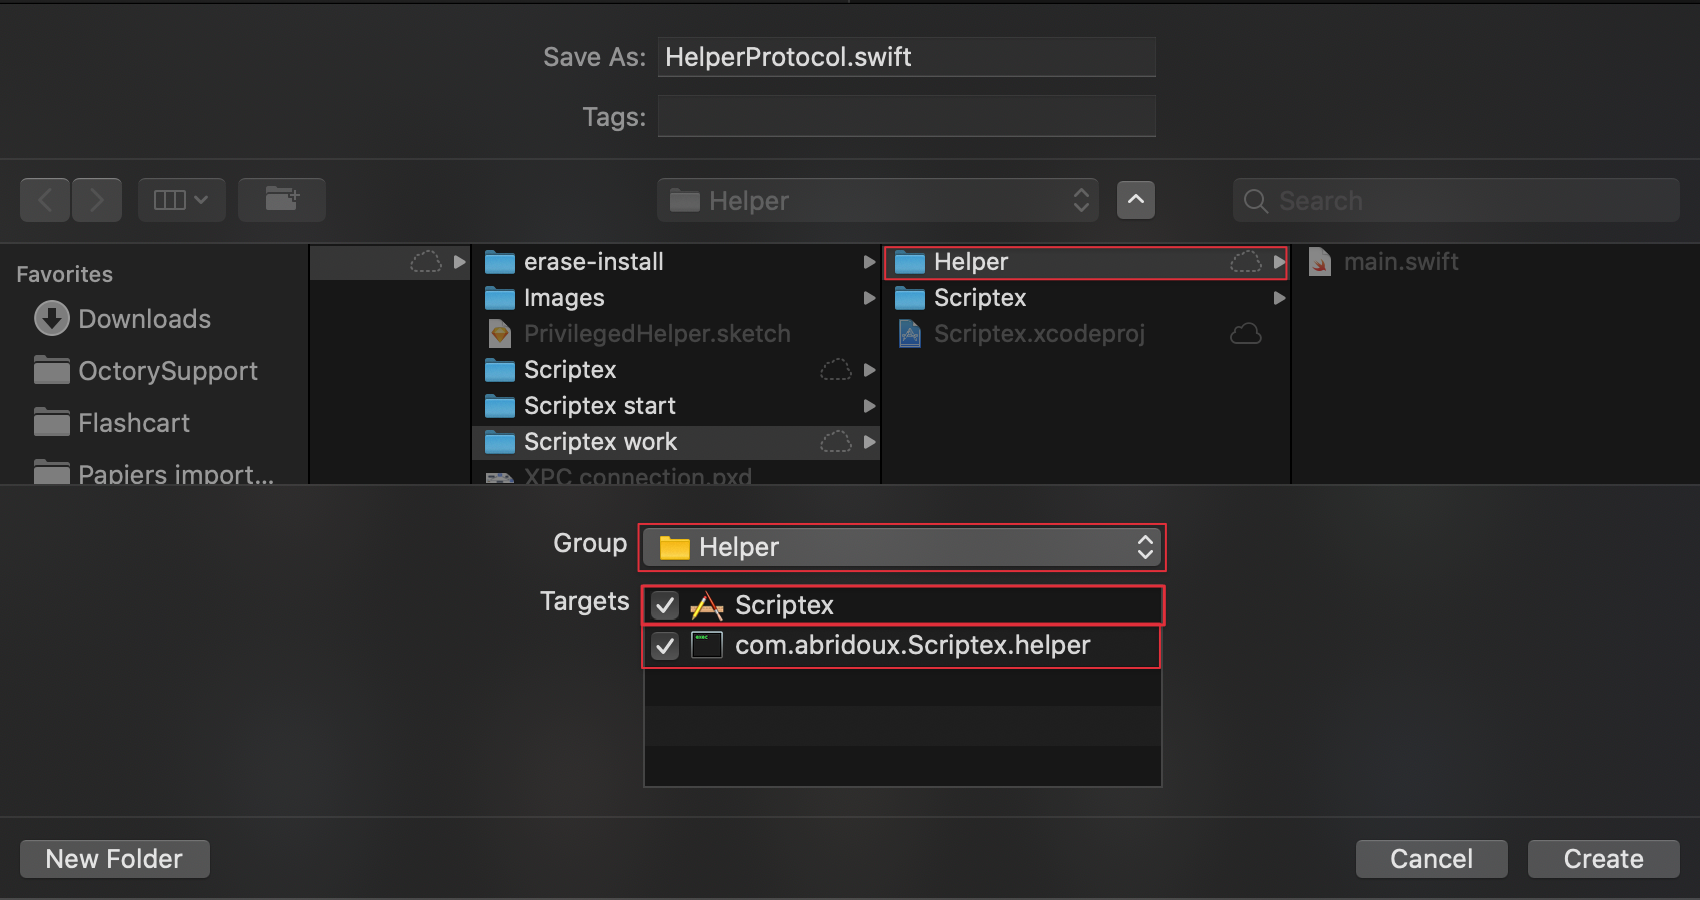
We will start by implementing the two protocols I mentioned above for the app and the Helper to be able to communicate properly. Create a new Swift file named ”HelperProtocol” in the Helper folder and with both the com.your-company.Scriptex.helper and Scriptex targets selected.
Once done, write the following in the file.
import Foundation

@objc(HelperProtocol)
public protocol HelperProtocol {
    @objc func executeScript(at path: String) async throws -> String
}
Several remarks:
- Anything involved in the XPC connection has to be convertible to Objective-C.
- The @objc(HelperProtocol) is here to ensure the XPC connection accept the protocol as Objective-C.
- We have to add the @objc to all functions of the protocol
Now please do the same for the file RemoteApplicationProtocol (Helper folder, com.your-company.Scriptex.helper and Scriptex targets) and paste the following.
import Foundation

@objc(MainApplicationProtocol)
public protocol RemoteApplicationProtocol {
    // empty protocol but required for the XPC connection
}
Just before we implement the Helper, let’s create another file to store useful constants. Please name it HelperConstants (choose both Scriptex and helper target) and paste the following:
import Foundation

enum HelperConstants {
    static let helpersFolder = "/Library/PrivilegedHelperTools/"
    static let domain = "com.abridoux.Scriptex.helper"
    static let helperPath = helpersFolder + domain
}
Also, replace the company name to yours in the domain value.
The HelperConstants is an enum rather than a struct to make sure it cannot be instantiated.
This is a technique in Swift to have a similar behavior as namespaces to store constants or offer functions collections in a service.
Implementing the Helper
Before writing down the Helper.swift file, let's break down its code a bit. More than implementing the protocol HelperProtocol, the helper class will implement the NSXPCListenerDelegate protocol and hold a NSXPCListener to listen for incoming connection requests. This protocol has only one required function:
func listener(_ listener: NSXPCListener, shouldAcceptNewConnection newConnection: NSXPCConnection) -> BoolThis function will be called by the system when a new connection request arrives. This is our opportunity to configure the connection to make sure it has the correct interface. At the end of the function, we have to call connection.resume() for the connection to be established, as the connections are paused at the beginning.
do {
    try ConnectionIdentityService.checkConnectionIsValid(connection: newConnection)
} catch {
    NSLog("🛑 Connection \(newConnection) has not been validated. \(error.localizedDescription)")
    return false
}
func listener(_ listener: NSXPCListener, shouldAcceptNewConnection newConnection: NSXPCConnection) -> Bool {
newConnection.exportedInterface = NSXPCInterface(with: HelperProtocol.self)
newConnection.remoteObjectInterface = NSXPCInterface(with: RemoteApplicationProtocol.self)
newConnection.exportedObject = self

newConnection.resume()

return true
ConnectionIdentityService is a service to check a connection validity. It is implemented below.
The remote here is the calling application, so ”Scriptex”, while the exported interface is the one the helper says it implements.
To start listening to new connection requests with the NSXPCListener object, we will implement a run function, which we will call after having created a new Helper object in the main file:
To start listening to new connection requests with the NSXPCListener object, we will implement a run function, which we will call after having created a new Helper object in the main file:
func run() {
    // start listening on new connections
    listener.resume()
    // prevent the terminal application to exit
    RunLoop.current.run()
}
Also, we should implement the logic to actually execute scripts. Fortunately, this is something we already have in hand with the ExecutionService. In order to reuse it, we have to make the file ExecutionService.swift accessible in the target com.your-company.Scriptex.helper. Rather than simply moving the file and changing its target, we will create a new ExecutionService.swift file in the Helper folder/target and copy/paste the code. We will do so because we will still need the ExecutionService in the Scriptex target, although we will modify its content later.
So please create a new file named HelperExecutionService.swift in the Helper folder (so that the distinction with the app is clearer), and select the helper target. Then copy/paste the content of the file ExecutionService.swift in the Scriptex target inside the new file HelperExecutionService.swift. Finally rename the class ExecutionService to HelperExecutionService. Once done, here is the implementation of the HelperProtocol required function:
func executeScript(at path: String) async throws -> String {
    NSLog("Executing script at \(path)")
    do {
        return try await ExecutionService.executeScript(at: path)
    } catch {
        NSLog("Error: \(error.localizedDescription)")
        throw error
    }
}
Finally, we have to make the Helper class a subclass of NSObject for it to easily implement NSXPCListenerDelegate (which inherits from NSObjectProtocol), and we will override the empty initializer:
override init() {
    listener = NSXPCListener(machServiceName: HelperConstants.domain)
    super.init()
    self.listener.delegate = self
}
Here is the overall implementation Helper class in the Helper.swift file:
import Foundation

// MARK: - Helper

final class Helper: NSObject {

    // MARK: Properties

    let listener: NSXPCListener

    // MARK: Init

    override init() {
        listener = NSXPCListener(machServiceName: HelperConstants.domain)
        super.init()
        listener.delegate = self
    }
}

// MARK: - HelperProtocol

extension Helper: HelperProtocol {

    func executeScript(at path: String) async throws -> String {
        NSLog("Executing script at \(path)")
        do {
            return try await ExecutionService.executeScript(at: path)
        } catch {
            NSLog("Error: \(error.localizedDescription)")
            throw error
        }
    }
}

// MARK: - Run

extension Helper {

    func run() {
        // start listening on new connections
        listener.resume()

        // prevent the terminal application to exit
        RunLoop.current.run()
    }
}


// MARK: - NSXPCListenerDelegate

extension Helper: NSXPCListenerDelegate {

    func listener(_ listener: NSXPCListener, shouldAcceptNewConnection newConnection: NSXPCConnection) -> Bool {
        do {
            try ConnectionIdentityService.checkConnectionIsValid(connection: newConnection)
        } catch {
            NSLog("🛑 Connection \(newConnection) has not been validated. \(error.localizedDescription)")
            return false
        }

        newConnection.exportedInterface = NSXPCInterface(with: HelperProtocol.self)
        newConnection.remoteObjectInterface = NSXPCInterface(with: RemoteApplicationProtocol.self)
        newConnection.exportedObject = self

        newConnection.resume()
        return true
    }
}
Now we can update the main.swift file to run the helper:
import Foundation

NSLog("Scriptex Helper started")
let helper = Helper()
helper.run()
And... that’s it for the Helper code! We shall now make Scriptex use it.
An additional part has been added to the Helper implementation at the end of this tutorial to check the connection identity and thus improve security.
Connect to the Helper
To connect to the Helper, we will implement a HelperRemoteProvider enum, which will do the heavy lifting. It will have one public async function remote() which can throw an error, will create a connection to the Helper and hand over a HelperProtocol object which will send instructions directly to the Helper. Also, our HelperRemoteProvider enum will try to install the Helper if it not already installed. Thus, things will be very transparent for the rest of our app as we will be able to use the Helper very easily:
let output = try await HelperRemoteProvider.remote().executeScript(at: path)We will implement 4 functions:
- installHelper() to install the Helper
- createConnection() to establish a connection with the Helper
- connection() which will either install the Helper if not already installed or directly call the createConnection function
- remote() which will retrieve the HelperProtocol object from the connection
Ready? Let’s get started!
Go ahead and create a file named HelperRemoteProvider.swift
Install the Helper
This is certainly the hardest and less intuitive part, especially if you are coming like me from the wonderful world of Swift/iOS (if you are: high-five 🤚). But working on macOS, I have learned that authorization and privileges escalation processes are far from being straightforward. It’s a bit old, not developer-friendly but to be honest, when it works, it does it great. And when you take a look at the documentation last update, I find it amazing that such APIs are still working perfectly - when you give them the right inputs.
I’ll try to explain the authorization process as I understand it. Again, this is me trying to find purpose with the documentation. To authorize a process (here the blessing of a privileged Helper to install it), we have to work with an AuthorizationRef. We then configure it with objects like AuthorizationItems (what specific process we want to launch) held by a AuthorizationRights, AuthorizationFlags to specify how the authorization should be asked to the user, and OSStatus to handle errors.
This is how it looks like:
/// Install the Helper in the privileged helper tools folder and load the daemon
private static func installHelper() throws {

    // try to get a valid empty authorization
    var authRef: AuthorizationRef?
    var authStatus = AuthorizationCreate(nil, nil, [.preAuthorize], &authRef)
    defer {
        if let authRef {
            AuthorizationFree(authRef, [])
        }
    }

    guard authStatus == errAuthorizationSuccess else {
        throw ScriptexError.helperInstallation("Unable to get a valid empty authorization reference to load Helper daemon")
    }

    // create an AuthorizationItem to specify we want to bless a privileged Helper
    authStatus = kSMRightBlessPrivilegedHelper.withCString { authorizationString in
        // authItem
        var authItem = AuthorizationItem(name: authorizationString, valueLength: 0, value: nil, flags: 0)

        return withUnsafeMutablePointer(to: &authItem) { pointer in
            // authRights
            var authRights = AuthorizationRights(count: 1, items: pointer)
            let flags: AuthorizationFlags = [.interactionAllowed, .extendRights, .preAuthorize]
            return AuthorizationCreate(&authRights, nil, flags, &authRef)
        }
    }

   guard authStatus == errAuthorizationSuccess else {
       throw ScriptexError.helperInstallation("Unable to get a valid loading authorization reference to load Helper daemon")
   }
}
The defer statement guarantees that that the code inside the closure will be execute before leaving the function scope
Now that we have the blessing for a privileged helper, we will try to install it with SMJobBless(). This function will try to install a program identifier by a label. Here it is HelperConstants.domain: com.your-company.Scriptex.helper. This is why we renamed the Helper target, remember? It will then setup a launch daemon to listen to connection requests to the Helper. This function will take 4 parameters:
- the domain of the job, which strangely, can only be kSMDomainSystemLaunchd (which is strange as it has no reasons to be a parameter then?)
- the label of the program to install as a CFString (a specific string wrapper when working with authorization and other security macOS APIs)
- the Authorization Reference to make sure we have the right to do it
- an pointer to an Unmanaged<CFError> error for us to be able to know what went wrong if it actually did go wrong
So we end up with:
var blessErrorPointer: Unmanaged<CFError>?
let wasBlessed = SMJobBless(kSMDomainSystemLaunchd, HelperConstants.domain as CFString, authRef, &blessErrorPointer)

guard !wasBlessed else { return }
// throw error since authorization was not blessed
let blessError: Error = if let blessErrorPointer {
    blessErrorPointer.takeRetainedValue() as Error
} else {
    ScriptexError.unknown
}
throw ScriptexError.helperInstallation("Error while installing the Helper: \(blessError.localizedDescription)")
And we are done with installing (pheeew!).
And here is the final function:
private static func installHelper() throws {

    // try to get a valid empty authorization
    var authRef: AuthorizationRef?
    var authStatus = AuthorizationCreate(nil, nil, [.preAuthorize], &authRef)
    defer {
        if let authRef {
            AuthorizationFree(authRef, [])
        }
    }

    guard authStatus == errAuthorizationSuccess else {
        throw ScriptexError.helperInstallation("Unable to get a valid empty authorization reference to load Helper daemon")
    }

    // create an AuthorizationItem to specify we want to bless a privileged Helper
    authStatus = kSMRightBlessPrivilegedHelper.withCString { authorizationString in var authItem = AuthorizationItem(name: authorizationString, valueLength: 0, value: nil, flags: 0)

        return withUnsafeMutablePointer(to: &authItem) { pointer in var authRights = AuthorizationRights(count: 1, items: pointer)
            let flags: AuthorizationFlags = [.interactionAllowed, .extendRights, .preAuthorize]
            return AuthorizationCreate(&authRights, nil, flags, &authRef)
        }
    }

    guard authStatus == errAuthorizationSuccess else {
       throw ScriptexError.helperInstallation("Unable to get a valid loading authorization reference to load Helper daemon")
    }

    var blessErrorPointer: Unmanaged<CFError>?

    let wasBlessed = SMJobBless(kSMDomainSystemLaunchd, HelperConstants.domain as CFString, authRef, &blessErrorPointer)

    guard !wasBlessed else { return }
    // throw error since authorization was not blessed
    let blessError: Error = if let blessErrorPointer {
        blessErrorPointer.takeRetainedValue() as Error
    } else {
        ScriptexError.unknown
    }
    throw ScriptexError.helperInstallation("Error while installing the Helper: \(blessError.localizedDescription)")
}
Return the remote
We have two remaining functions to implement: connection() and remote(). In the first one, we will simply check if the Helper is installed. If it is, we will directly call createConnection(), otherwise, we will try to install the Helper first:
private func connection() throws -> NSXPCConnection {
    if !isHelperInstalled {
        // we’ll try to install the Helper if not already installed, but we need to get the admin authorization
        try installHelper()
    }
    return createConnection()
}
Regarding remote(), we will simply call connection() and try to extract the remote from it, using its remoteObjectProxyWithErrorHandler function which returns an object conforming to the remoteObjectInterface we set (so HelperProtocol). This time, if an error is encountered during the function call, the error will be provided asynchronously. Even though it seems logical that the error handler is in fact called synchronously, there is no certainty. To make sure we throw the error if one is provided, we have to ensure that the continuation will catch it. But since a continuation cannot be resumed twice, it's needed to make sure that if we already failed to unwrap the helper variable and threw the associated error, the error provided by the function remoteObjectProxyWithErrorHandler will not be considered. That's why the class ContinuationResume is implemented: to offer a Sendable reference that accept to modify its property alreadyResumed only once. Feel free to take a look at it in the materials repo.
static func remote() async throws -> some HelperProtocol {
    let connection = try connection()

    return try await withCheckedThrowingContinuation { (continuation: CheckedContinuation<any HelperProtocol, Error>) in let continuationResume = ContinuationResume()
        let helper = connection.remoteObjectProxyWithErrorHandler { error in
            // an error arrived
            guard continuationResume.shouldResume() else { return }
            // 1st error to arrive, it will be the one thrown
            continuation.resume(throwing: error)
        }

        if let unwrappedHelper = helper as? HelperProtocol {
            guard continuationResume.shouldResume() else {
              // an error occurred even though the helper was retrieved
              return
            }
            continuation.resume(returning: unwrappedHelper)
        } else {
            if continuationResume.shouldResume() {
                // 1st error to arrive, it will be the one thrown
                let error = ScriptexError.helperConnection("Unable to get a valid 'HelperProtocol' object for an unknown reason")
                continuation.resume(throwing: error)
            }
        }
    }
}
And that’s it! 🙌 To make sure you have the correct HelperRemote struct, don't hesitate to download the Scriptex (code final) folder or simply the Scripte final folder.
As you might notice, all the functions are marked as private to enforce the fact that when using a HelperRemote object, we only care about the remote, not the heavy lifting behind.
Now, for the easy and rewarding part, please change the implementation of executeScript(at:then:) in the ExecutionService struct:
static func executeScript(at path: String) async throws -> String {
    try await HelperRemoteProvider.remote().executeScript(at: path)
}
Pretty nice, don’t you think? Any time you will need the Helper in the project, it will be accessible with a single line of code. This is obviously possible for any other projects where you need a Helper.
Install and sign the Helper
If you have skipped the previous part, you can find the project with all the code in the Scriptex (code final) folder.
Install the Helper
Setup files
We have to add two files in the Helper folder before we can install it with the code we wrote in the previous part. The first file is the Info.plist of the Helper program. Similarly with the application Info.plist file, this one will contain relevant information regarding the Helper program, and we will need automatically add a new key to it when signing the Helper. So please go on and create a new PropertyList file named Info.plist in the Helper folder and with the Helper target selected. When created, fill it with those lines, specifying your own company name in the identifiers, as usual:

The second file is the Launch Daemon which will act as a Mach service and forward the connection request to the Helper program. So create a new PropertyList file, name it Launchd and fill it with the following lines (once again setting your own company name). The key StandardOutputPath is where the Helper will write the NSLog if you have some. If you do not see any message, try adding the key StandardErrorPath with the same value.

This Launchd file will look for the program named com.abridoux.Scriptex.helper in the folder /Library/PrivilegedHelperTools. This is where the system will install the Helper when asked by the application. Also, the key MachServices → com.your-company.Scriptex.helper with a true (YES) value indicates that the daemon will listen to the mach service with the same label as the one we specified in the Helper initialisation:
self.listener = NSXPCListener(machServiceName: HelperConstants.domain)with
HelperConstant.domain="com.abridoux.Scriptex.helper"Last step: the Python script we will use to sign the Helper does not seem to play well with the $(BUNDLE_IDENTIFIER) variable set by default in the app Info.plist file for the Bundle identifier key by Xcode when the project is created. The reason might be because the Python script does not know it's variable to replace to variable. So please change this value yo your hardcoded bundle identifier:
Copy the binary
Now we have to remaining tasks before we can properly use the Helper after installation. First, we have to copy the binary Xcode generate from our code in the product folder. Here, we will use the standard destination for program bind to a Launch service. So please move to the com.your-company.Scriptex.helper target Build Phases, and add a Copy Files build phase.
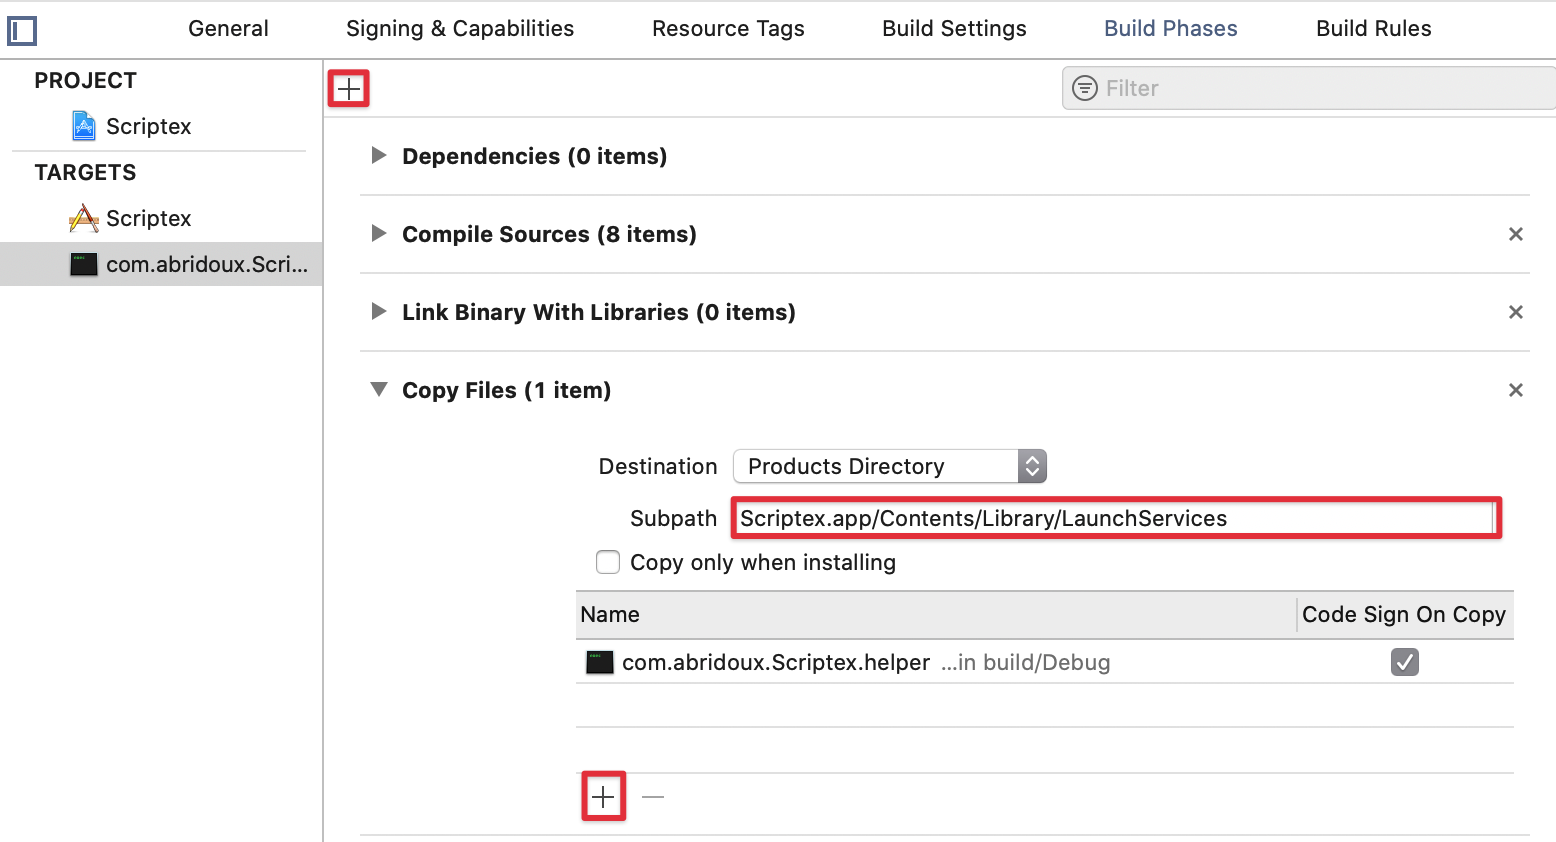
When done, write the following path in the Subpath text field: "Scriptex.app/Contents/Library/LaunchServices"; and add the Helper target item. Check the case Code Sign On Copy. Thus, Xcode will copy the binary into the specified file.
When your archive and export the app, you will easily find the Helper program, which we will use in the final part of this tutorial to install it manually. When you build the app for debugging, you will rather find it in a similar path (the identifier part after Scriptex should be different):
~/Library/Developer/Xcode/DerivedData/Scriptex-hfwe.../Build/Products/Debug.
I am telling you that because we will need to access to the Helper at this path to sign it.
Embed the setup files
The second task is a bit trickier. Remember the setup files Info.plist and Launchd.plist we created? When the Helper binary is created, it does not contain the information in those files by default, and it requires them to run properly. Also, when we will sign the Helper, the signature will be contained in the Info.plist file. This will ensure the Helper does not accept connections from another application that the one we will specify. So we need to embed those two files. I do not know for sure why we have to embed the Launcd.plist file, although it is required as mentioned in the Apple documentation.
To do so, we are setting a specific Link Flag in Build Settings → Linking. If you can't find the Linking section, try to set the build setting filter to All.

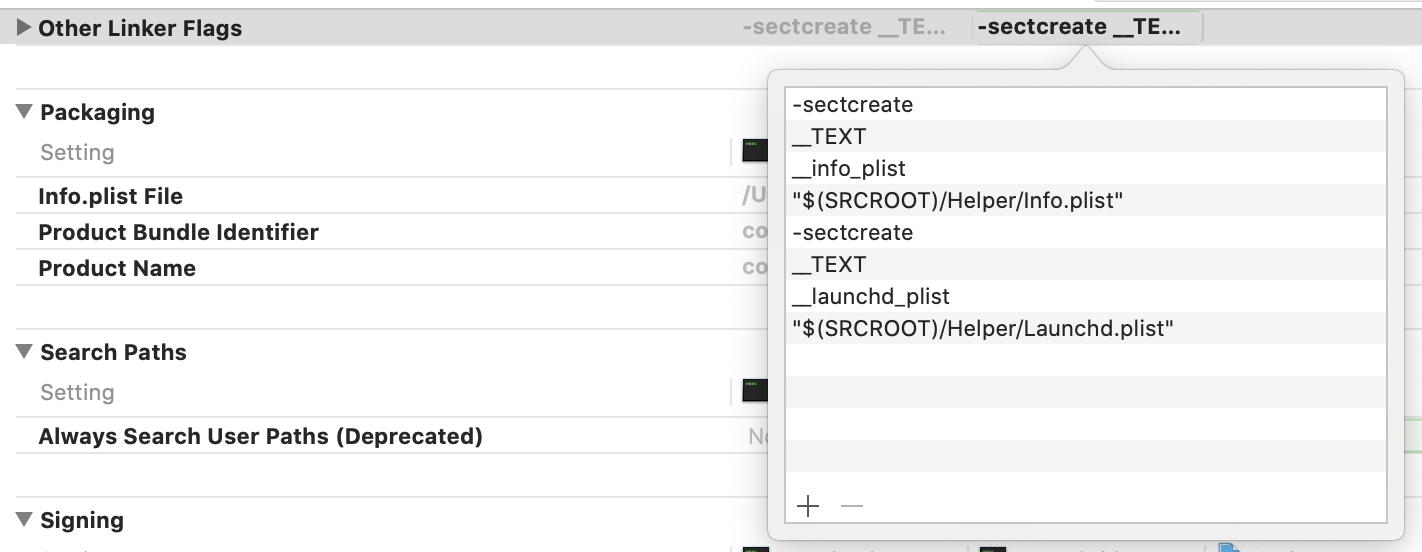
Find the row Other Linker Flags, double click on the row in the com.your-company.Scriptex.helper column, click on the plus + button and add the following (you can copy and paste)
-sectcreate __TEXT __info_plist "$(SRCROOT)/Helper/Info.plist" -sectcreate __TEXT __launchd_plist "$(SRCROOT)/Helper/Launchd.plist"When you close the popover and open it again, it should look like this:
Setup the certificate
To sign the binary. At least a development certificate is required. So please select the Development option if “Automatically manage signing” is checked:
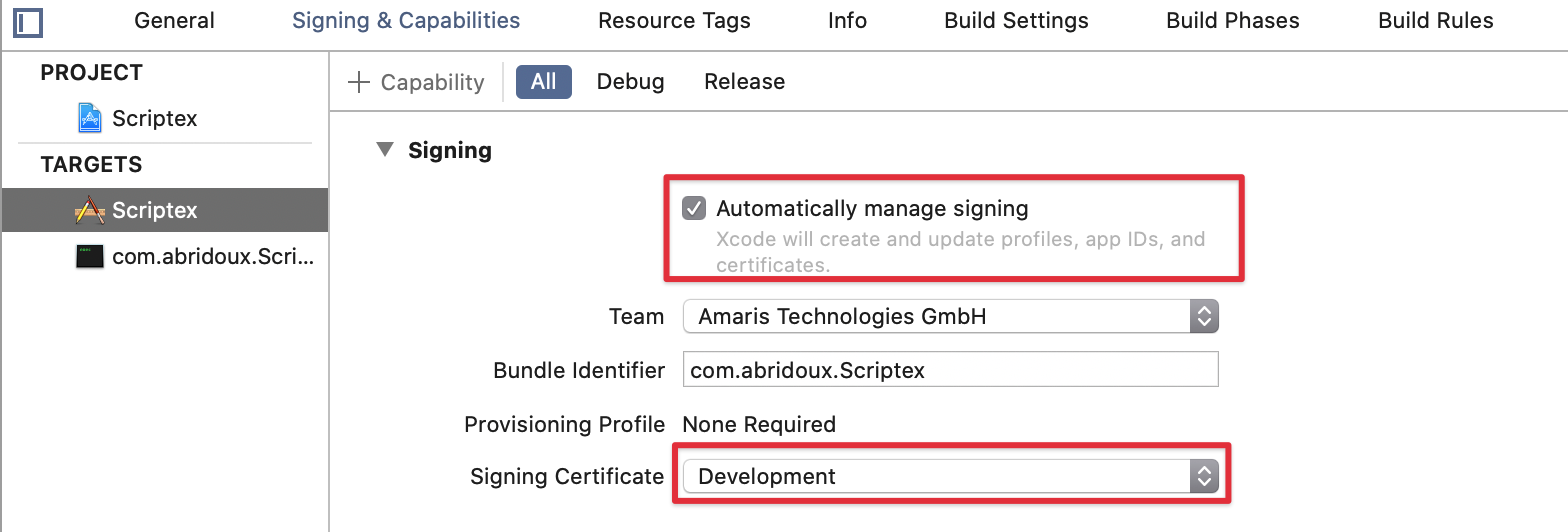
If “Automatically manage signing” is unchecked, please select a Mac developer certificate:
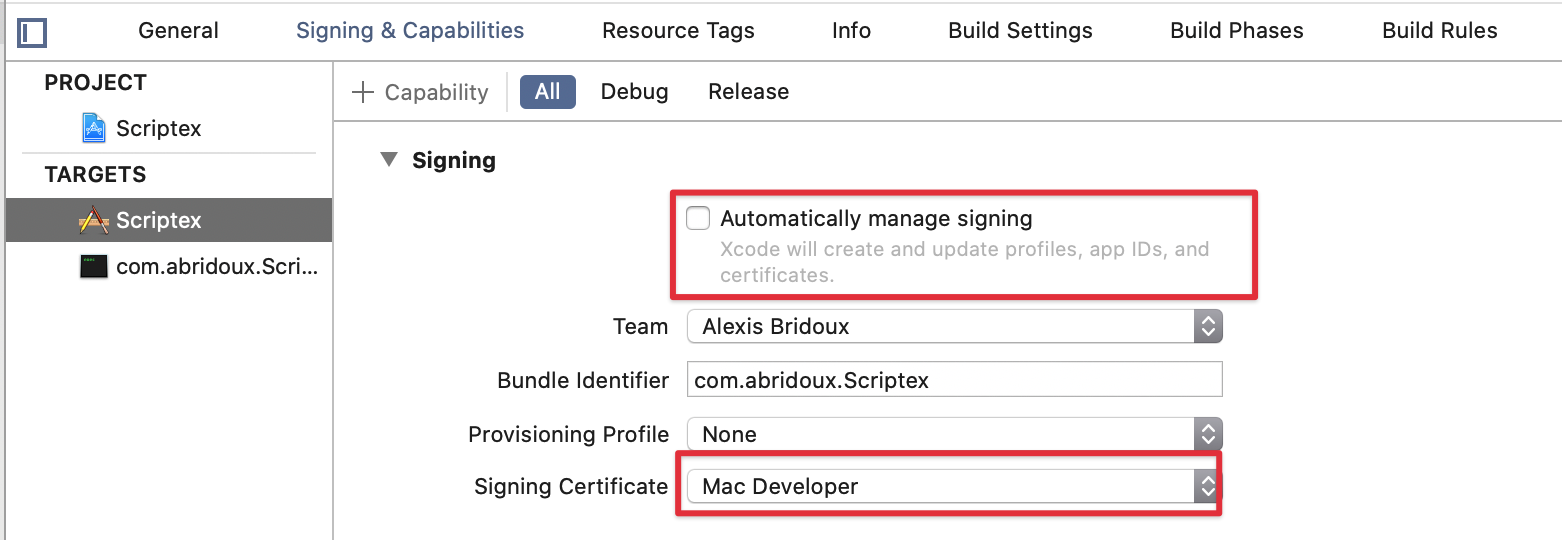
Later if you notarize the application, you will need to sign the Helper again with a Developer ID Application certificate.
Now we are ready to build!
Build the binary a first time
In order to sign the binary, we first have to generate it. Then we will use the Python script SMJobBlessUtil.py which you can find in the materials Scripts folder to sign the binary. So please go on and build the project. To make sure everything went well after the build, open the folder similar to ~/Library/Developer/Xcode/DerivedData/Scriptex-hfweqj.../Build/Products/Debug and navigate to Scriptex.app/Contents/Library/LaunchServices/. You should find the Helper with the name of the target.
Now let's make the final touch, shall we?
Sign the Helper
The script SMJobBlessUtil.py - which is provided by Apple - will add new keys in the app and Helper Info.plist files. The key added in the application Info.plist file will state that the program com.your-company.Scriptex.helper is owned by the application. This allows to make sure the application does not use another malicious Helper program. Similarly, the key added in the Helper Info.plist file will state that the Helper is owned by the application, and thus make sure that no other application can use it. This is the key that ensures security and prevent another app to gain the root privileges the Helper offers. So let's do it right.
Make sure you can execute the Python script if it is not already the case, and execute it with the setreq command this way:
./SMJobBlessUtil.py setreq \
"/Users/alexisbridoux/Library/Developer/Xcode/DerivedData/Scriptex-hfw.../Build/Products/Debug/Scriptex.app" \ "~/Documents/Blog/Tutos/Privileged Helper/Scriptex final/Scriptex/Info.plist" \ "~/Documents/Blog/Tutos/Privileged Helper/Scriptex final/Helper/Info.plist"
The first argument if the location of the build. The script will then look in the folder Contents/Library/LaunchServices starting from this endpoint (that's why we made Xcode copy the Helper binary here). So the final path will be /Users/alexisbridoux/Library/Developer/Xcode/DerivedData/Scriptex-hfwe.../Build/Products/Debug/Scriptex.app but the scripts is kind enough to avoid us to write it fully.
The second argument is the location of the application Info.plist file, and the third and final argument is the location of the Helper Info.plist file. If we did everything right, the terminal should output something similar:
/Users/alexisbridoux/Documents/Blog/Tutos/Privileged Helper/Scriptex final/Scriptex/Info.plist: updated
/Users/alexisbridoux/Documents/Blog/Tutos/Privileged Helper/Scriptex final/Helper/Info.plist: updated
You can checkout the Info.plist files. They should now contain a new key:


And now, ladies and gentlemen, for the final part of this tutorial, please run the app, and specify the path to the script which requires the root privileges to be executed:
You should be prompted a similar alert:
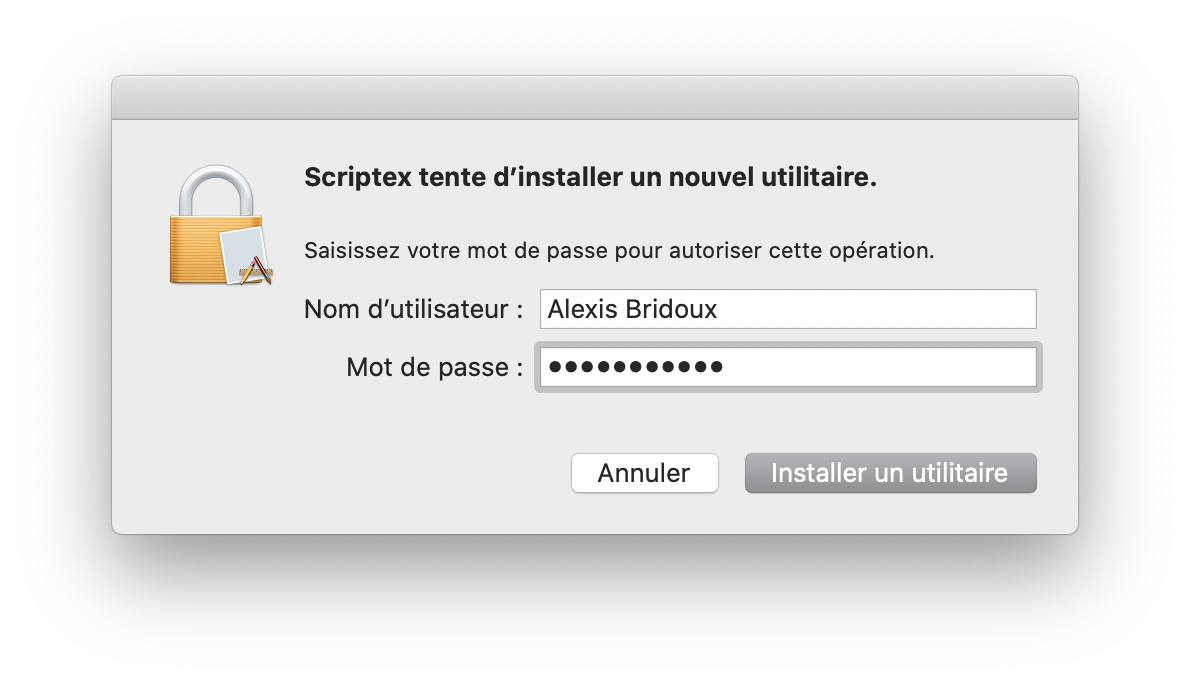
This is the part when you dealt with all the strange key: this is the part when we try to install the Helper.
Once you enter your password (make sure you enter the credentials of an admin), and click the Install button, you should be able to see the result in the Scriptex window:
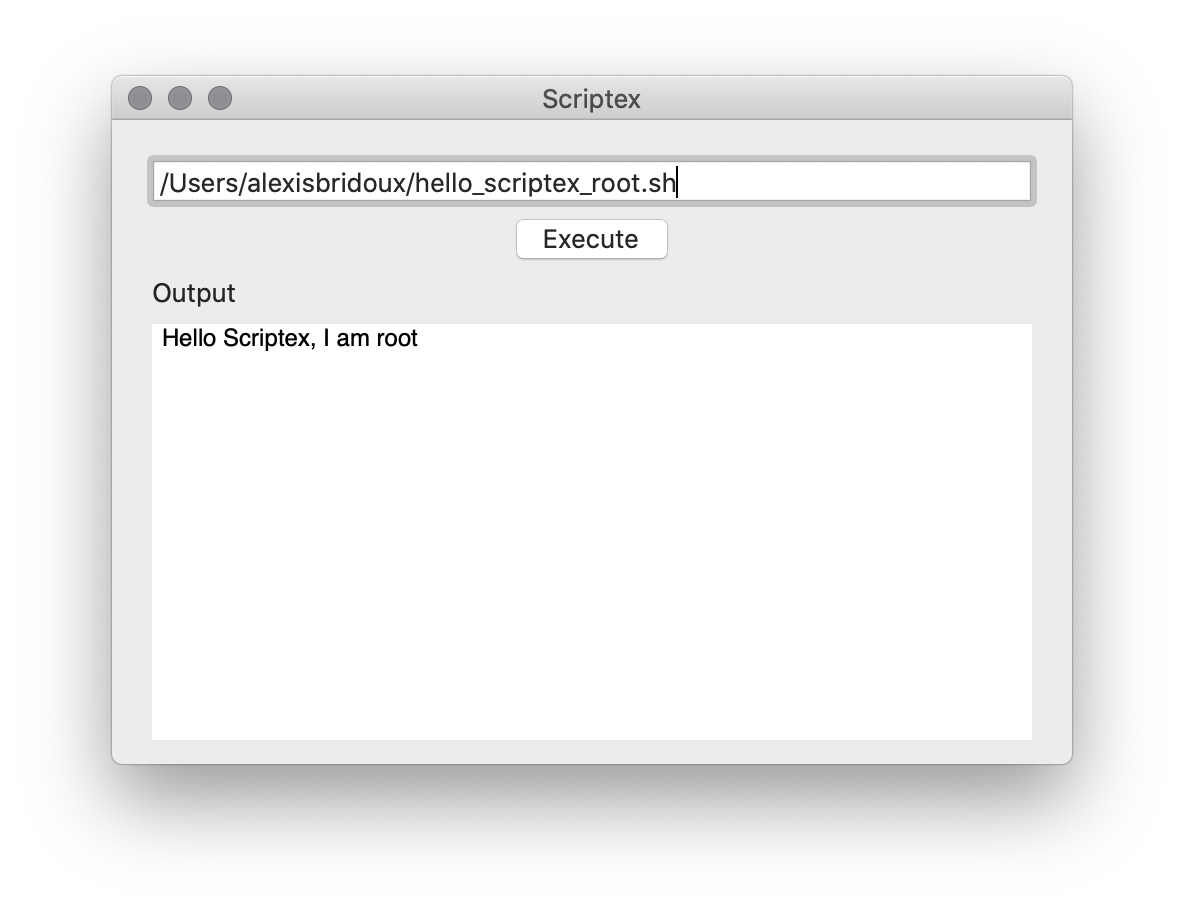
We did it!
In case you see something like "Operation not permitted" in Scriptex output, this might mean that the Helper is not able to access to the script you want to execute. Rather than trying to request a full disk access in this tutorial, you can test the script execution by putting it inside /Users/Shared/.
Validating the connection
I had the opportunity to talk with some other macOS developers, and they advised me to add a security check to this Helper implementation. In this new part we'll implement a ConnectionIdentityService to make sure only the companion app can connect to the Helper.
I could not make sure this is required, and the offered solution uses a hack. But I have been told this what Apple recommends under the table. So it's up to you to decide whether you should implement this additional security check or not. Just know that it's not a big deal and will not prevent the Helper to work.
The solution we are going to implement is based on the work of Wojciech Reguła and his dedicated repository. Other resources that helped me understanding the problem are linked at the end.
Identity
To make sure the program trying to connect to the Helper is the companion application, we will use the auditToken property of the incoming NSXPCConnection.
The thing is, this property is private, which means that we can't access it normally. Private properties are not supposed to be used and the code using it should not rely on it as it could be changed or removed without a warning. This is why I mention I was not sure of this solution. But as I mentioned above, this is why Apple recommends "under the table" from what I have been told. So, let's use it.
Please create a new Swift file named ConnectionIdentityService and add the following:
enum ConnectionIdentityService {

}
Accessing a private property from a class can be done in Swift using the Object Runtime framework.We are going to read this property at runtime using the runtime behaviour of Obj-C.
The first function to be implemented is the one to get the token data from a NSXPCConnection. Here it is
private static func tokenData(in connection: NSXPCConnection) throws -> Data {
    let property = "auditToken"

    guard connection.responds(to: NSSelectorFromString(property)) else {
        throw ScriptexError.helperConnection("'NSXPCConnection' has no member '\(property)'")
    }
    guard let auditToken = connection.value(forKey: property) else {
        throw ScriptexError.helperConnection("'\(property)' from connection is 'nil'")
    }
    guard let auditTokenValue = auditToken as? NSValue else {
        throw ScriptexError.helperConnection("Unable to get 'NSValue' from '\(property)' in 'NSXPCConnection'")
    }
    guard var auditTokenOpaque = auditTokenValue.value(of: audit_token_t.self) else {
        throw ScriptexError.helperConnection("'\(property)' 'NSValue' is not of type 'audit_token_t'")
    }

    return Data(bytes: &auditTokenOpaque, count: MemoryLayout.size) }
Use the token
Now it's time to use this hard earned token! To not pollute the Helper class, we will implement this logic in a service named ConnectionIdentityService. This service will have one visible static function: isConnectionValid(connection: NSXPCConnection) -> Bool. As mentioned above, a service is a collection of functions with no state. As the service should not be initialised to be used, the functions are static. This means that to run the function isConnectionValid, we will write
ConnectionIdentityService.checkConnectionIsValid(connection: newConnection)import Foundation
// MARK: - Check error
extension OSStatus {
/// If the status is not a success, get the error out of it and throw it.
func checkError(_ functionName: String) throws {
if self == errSecSuccess { return }
throw SecurityError(status: self, functionName: functionName)
}
}
// MARK: - SecError
extension OSStatus {
/// An error that might be thrown by the /// [Security Framework](https://developer.apple.com/documentation/security/1542001-security_framework_result_codes)
struct SecurityError: Error {
// MARK: Properties
let localizedDescription: String
// MARK: Init
init(status: OSStatus, functionName: String) {
let statusMessage = SecCopyErrorMessageString(status, nil) as String? ?? "Unknown sec error"
localizedDescription = "[\(functionName)] \(statusMessage)"
}
}
} To validate the connection in the service will be performed in two steps. First, we will get the SecCode value of the connection from the auditToken value. The SecCode class is like the signature of a program.
Then, we will put this signature against the one we are excpeting, under the form of a SecRequirement class, instantiated from a requirement string. This string is similar to the one written in the Info.plist file by the python script. It specifies that some informations are required, and what should be their values. For instance, it will specifies the certificate type and the team identifier that it belongs to.
Let's start by implementing the first function to get the SecCode class. Add the following to ConnectionIdentityService
private static func secCode(from token: Data) throws -> SecCode {
    let attributesDict = [kSecGuestAttributeAudit: token]

    var secCode: SecCode?
    try SecCodeCopyGuestWithAttributes(nil, attributesDict as CFDictionary, [], &secCode)
        .checkError("SecCodeCopyGuestWithAttributes")

    guard let secCode else {
        throw ScriptexError.helperConnection("Unable to get secCode from token using 'SecCodeCopyGuestWithAttributes'")
    }

    return secCode
}SecCode could not be retrieved. Here is a breakdown.
- The
secCodeis declared to be filled when calling theSecCodeCopyGuestWithAttributesfunction. TheattributesDictis used to pass the token with a specific key. - The function
SecCodeCopyGuestWithAttributeswill identify the program corresponding to the provided token. Passingnilas the first parameter indicates that it's the system kernel that should be asked (according to the doc). The last parameter is a pointer to the value where the identity/signature should be put. The flags parameter are not relevant to our use case. - We check if the status returned by the funtion has an error (when dealing with C APIs, it's common to handle errors this way, as you might have notice when installing the Helper). If there is an error, we log it and return
nil. - Everything went fine up to this point, and we are able to return the
secCode.
Now that we can get the SecCode from the token, we can validate it against our requirements built from a requirementString.
Let's start by adding this requirement string. Add the following to the ConnectionIdentityService enum.
static private let requirementString =
    #"anchor apple generic and identifier "\#(HelperConstants.bundleID)" and certificate leaf[subject.OU] = "\#(HelperConstants.subject)""# as CFString
Using a string enclosed with sharp signs '#' is called "raw strings" and allows to more easily use double quotes in the string, while requiring to add a sharp sign in the interpolated strings \#().
Learn more
The compiler should complain that HelperConstants does not have a bundleID and subjectOU property. So let's add them with some explanations.
enum HelperConstants {
    static let bundleID = "com.abridoux.Scriptex"
    static let subject = "[TEAM_ID]"
    // other constants
}bundleID, nothing new, it's what identifies the app and we have already dealt with it. Just make sure to change the company name 😉
The
subjectOU corresponds to the team bundle identifier. If you don't know where to find it, it's the string between brackets in the certificate name in your keychain.
Some examples I have found use the common name of the certificate (which require more attention to avoid typos). This is useful when you want to make sure a specific certificate is used, and not only validate the team identifier. In this case, the part "subject[OU]" in the requirement string should be replaced with "subject[CN]" and the value of
subject should be changed to something like "Developer ID Installer: Alexis Bridoux ([TEAM_ID])".
Now that the requirement string is ready, let's use to build the requirements and check the code signature against them. Go back to ConnectionIdentityService and add the following function.
private static func verifySecCode(secCode: SecCode) throws {
    var secRequirements: SecRequirement?

    try SecRequirementCreateWithString(requirementString, [], &secRequirements)
        .checkError("SecRequirementCreateWithString")
    try SecCodeCheckValidity(secCode, [], secRequirements)
        .checkError("SecCodeCheckValidity")
}- The requirements are built from the requirement string. As this is a C API, it does not know about Swift
String. That's why we had to cast it asCFString(CoreFoundation String) - If the result of the requirement build function has an error, it logged and we return false to not validate the connection
- Now that everything is ready, we can call the function to check the validity of the code signature
secCodeagainst our requirements. - Again, if the result of the function call has en error, it's logged and and we exit by returning
false. Otherwise, we can at last returntrueto validate the connection.
Now for the final part, it's time to connect those two functions in a single public one that will be called by in the Helper to know if the connection is valid.
Please add this function to ConnectionIdentityService.
static func checkConnectionIsValid(connection: NSXPCConnection) throws {
    let tokenData = try tokenData(in: connection)
    let secCode = try secCode(from: tokenData)
    try verifySecCode(secCode: secCode)
}
We can now call the ConnectionIdentityService.checkConnectionIsValid(connection:) function in the Helper function that accepts a new connection.
This should come first.
func listener(_ listener: NSXPCListener, shouldAcceptNewConnection newConnection: NSXPCConnection) -> Bool {
    do {
        try ConnectionIdentityService.checkConnectionIsValid(connection: newConnection)
    } catch {
        NSLog("🛑 Connection \(newConnection) has not been validated. \(error.localizedDescription)")
        return false
    }

    // interfaces...

    newConnection.resume()

    return true
}The solution from M. Reguła will also check the entitlements of the application and not only its signature. This tutorial is already long enough to explain this part, so feel free to take a look at his solution if that's something you want to implement.
Optionally log the application's infos
I wanted to add a last part from the solution of M. Reguła to log some infos regarding the connection. To do so, we have to work on a new class SecStaticCode, to inspect an application installed in the system. Fortunately, this will require only a function call. Then we will be able to get the informations from this static code.
This part can be found in the final project, and here is a breakdown.
private static func logInfo(about secCode: SecCode) throws {
    var secStaticCode: SecStaticCode?
    var cfDictionary: CFDictionary?

    try SecCodeCopyStaticCode(secCode, [], &secStaticCode)
        .checkError("SecCodeCopyStaticCode")

    guard let secStaticCode else {
        throw ScriptexError.helperConnection("Unable to get a 'SecStaticCode' from 'SecCode'")
    }

    try SecCodeCopySigningInformation(secStaticCode, [], &cfDictionary)
        .checkError("SecCodeCopySigningInformation")

    guard let dict = cfDictionary as NSDictionary?,
        let info = dict["info-plist"] as? NSDictionary
    else { return }

    let bundleID = info[kCFBundleIdentifierKey as String] as? NSString ?? "Unknown"
    NSLog("Received connection request from app with bundle ID '\(bundleID)'")
}- To store the
SecStaticCodeand the info about the app, we declare two variables. Similarly toCFString,CFDictionaryis required to work with C APIs, and can be casted asNSDictionaryfor us to work with. - Here the
secCodeis copied to aSecStaticCode - The informations for the static code are retrieved
- If the informations could not be retrieved, an error is logged. Otherwise, we play with dictionary to get the peiec of informations we want. Here, we get the bundle ID of the app trying to connect to the Helper, which could be useful to check if another program tried to use it - in a malicious way.
isConnectionValid function:
static func checkConnectionIsValid(connection: NSXPCConnection) throws {
    let tokenData = try tokenData(in: connection)
    let secCode = try secCode(from: tokenData)
    try? logInfo(about: secCode)
    try verifySecCode(secCode: secCode)
}
What a journey. Before we say good bye, I would like to add a few remarks regarding this tutorial and the topic we covered. Also, an optional part is here if you are an admin and want to deploy your application with the Helper without asking the user to enter the credentials of an admin.
A few remarks
Execute scripts
Executing a script with root privileges is certainly to be avoided in a production environment, as you can hardly make sure the script is not harmful. I used this example here because it was the simplest I could think of. That said, you could use a Helper to execute script, if you ensure that only the root user can create and edit it. This way, a malicious program could not take advantage of the application to execute a script with root privileges. In the application, you can then make sure that the script to be executed is has the proper permissions (an upcoming tutorial should tackle this issue).
Remove the Helper
When you application is done with the Helper, or when it is removed from the system, you should think about deleting the Helper too to avoid a useless security risk. The last part gives the required 3 lines to do so (launchctl unload, rm...)
Notarise the application and deploy it
To make sure that your application and the Helper can run on your users Macs, you should make sure to set the signing certificate to your Developer ID Application certificate before executing the Python script. Then build the project, execute the Python script, and build again to include the change into the binary. You can then send the app to the Apple notarisation service.
If you want to notarise the application with the Xcode interface, you should remove the Copy Files phase we setup earlier. Otherwise, Xcode will not let you send the application to the notarisation service as the archive will also contain another program (here the Helper).
That's all I could think of at the moment! This is the end of this tutorial.
If you liked it, or if it has been helpful, feel free to share a few words on Twitter (@Bigby_Woody to reach me), Reddit (u/Alexis-Bridoux) or contact me by email.
Still there, uh? This last part will explain how to bypass the alert when installing the Helper, by installing it before launching the app.
Install the Helper manually
First of all, this will require root privileges. Though this should not be a problem when installing the Helper with a MDM. Here is the solution.
You will simply install the Helper in the /Library/PrivilegedHelperTools folder, install the Launch Daemon in /Library/LaunchDaemons and load it. Easier said than done, right? That's why I wrote a script to handle this, inspired from a script written by Marc Thielemann. Also, thanks to Mark Lamont for his editing propositions.
You can find it in the repo in the Install Helper folder.
#!/bin/zsh
# install_helper v1.0.0
# (Alexis Bridoux) based on # Marc Thielemann script: https://github.com/autopkg/rtrouton-recipes/blob/master/Privileges/Scripts/postinstall

# ---- Colors ----
COLOR_FAILURE='\e[38;5;196m'
COLOR_SUCCESS='\e[38;5;70m'
COLOR_NC='\033[0m' # No Color

function print_error {
    >&;2 echo -e  "${COLOR_FAILURE}$1${COLOR_NC}"
    exit 1
}

function print_success {
    echo -e  "${COLOR_SUCCESS}$1${COLOR_NC}"
}
# ---------

# ---- Constants ----
CURRENT_DIR=$(pwd)

HELPER="com.abridoux.Scriptex.helper"
HELPERS_FOLDER="/Library/PrivilegedHelperTools"
HELPER_PATH="$HELPERS_FOLDER/$HELPER"

DAEMON="com.abridoux.Scriptex.helper.plist"
DAEMONS_FOLDER="/Library/LaunchDaemons"
DAEMON_PATH="$DAEMONS_FOLDER/$DAEMON"
# --------

# ---- Main ----

# test if root
# https://scriptingosx.com/2018/04/demystifying-root-on-macos-part-3-root-and-scripting/
if [[ $EUID -ne 0 ]]; then
    print_error "This script requires super user privileges, exiting..."
    exit 1
fi

# -- Helper --
echo "-- Helper -- "

if [[ ! -f "$HELPER_PATH" ]]; then
    # the Helper does not exist in the Helpers folder so copy it
    echo "Did not find the Helper at $HELPER_PATH. Copying it..."

    # create the Helper tools folder directory if needed
    if [[ ! -d $HELPERS_FOLDER ]]; then
        /bin/mkdir -p "$HELPERS_FOLDER"
        /bin/chmod 755 "$HELPERS_FOLDER"
        /usr/sbin/chown -R root:wheel "$HELPERS_FOLDER"
    fi

    # move the privileged helper into place
    /bin/cp -f "$CURRENT_DIR/$HELPER" "$HELPERS_FOLDER"

    if [[ -f "$HELPER_PATH" ]]; then
        print_success "Successfully copied $HELPER to $HELPERS_FOLDER"
    else
        print_error "Failed to copy $HELPER to $HELPERS_FOLDER"
        exit 1
    fi

    echo "Settings the correct rights to the Helper..."
    echo ""

    /usr/sbin/chown root:wheel "$HELPER_PATH"
    /bin/chmod 755 "$HELPER_PATH"
    # -- remove the quarantine if any
    /usr/bin/xattr -d com.apple.quarantine "$HELPER_PATH" 2>/dev/null
else
    # the Helper exists. Don't do anything
    print_success "$HELPERS_FOLDER already in place"
    echo ""
fi

# --- Daemon ---
echo "-- Daemon -- "
if [ ! -f  "$DAEMON_PATH" ]; then
    # the daemon does not exist in the daemons folder so copy it
    echo "Did not find the LaunchDaemon at $HELPER_PATH. Copying it..."

    # copy the daemon
    /bin/cp -f "$CURRENT_DIR/$DAEMON" "$DAEMONS_FOLDER"

    # ensure the daemon has beensuccessfully copied
    if [ -f  "$DAEMON_PATH" ]; then
        print_success  "Successfully copied $DAEMON to $DAEMONS_FOLDER"
    else
        print_error "Failed to copy $DAEMON to $DAEMONS_FOLDER"
        exit 1
    fi
else
    print_success "The daemon $DAEMON is already in place in $DAEMONS_FOLDER"
fi

# Set the rights to the daemon
echo "Settings the correct rights to the LaunchDaemon..."

/bin/chmod 644 "$DAEMON_PATH"
/usr/sbin/chown root:wheel "$DAEMON_PATH"
# -- remove the quarantine if any
/usr/bin/xattr -d com.apple.quarantine "$DAEMON_PATH" 2>/dev/null

# Load the daemon
loaded=`launchctl list | grep ${HELPER}`
if [ ! -n "$loaded" ]; then
    echo -e "Daemon not loaded. Loading it..."
    /bin/launchctl load -wF "$DAEMON_PATH"
else
    print_success "Daemon already loaded, exiting..."
    exit 0
fi

loaded=`launchctl list | grep ${HELPER}`

if [ -n "$loaded" ]; then
    print_success "Successfully loaded the Daemon at $DAEMON_PATH"
else
    print_error "Failed to load the Daemon at $DAEMON_PATH"
    exit 1
fi
To use this script, you will have to put it in a folder with the Helper and its dedicated Launchd.plist launch daemon. You can find those two files in the HelperFolder in the materials. Do notice that the Launchd.plist launch daemon is renamed to the name it will be assigned when install by the application: com.your-company.Scriptex.helper. Also, the file contains two new keys, Program and ProgramArguments which automatically are set by the system when setting up the daemon through the application. So we need to add them manually here. Finally, make sure to change the “abridoux” parts in the Constants section of the script with your company name, once again.
This script will require the root rights to be executed, as you might imagine. If you have already installed the Helper with the application, you should enter those commands before executing the install_helper.sh script to make sure it works fine:
launchctl unload /Library/LaunchDaemons com.abridoux.Scriptex.helper.plist
rm /Library/LaunchDaemons/com.abridoux.Scriptex.helper.plist
rm /Library/PrivilegedHelperTools/com.abridoux.Scriptex.helper
Those commands unload the launch daemon and delete it, as well as the Helper. If you run the script from the InstallHelper folder, you should see the following.
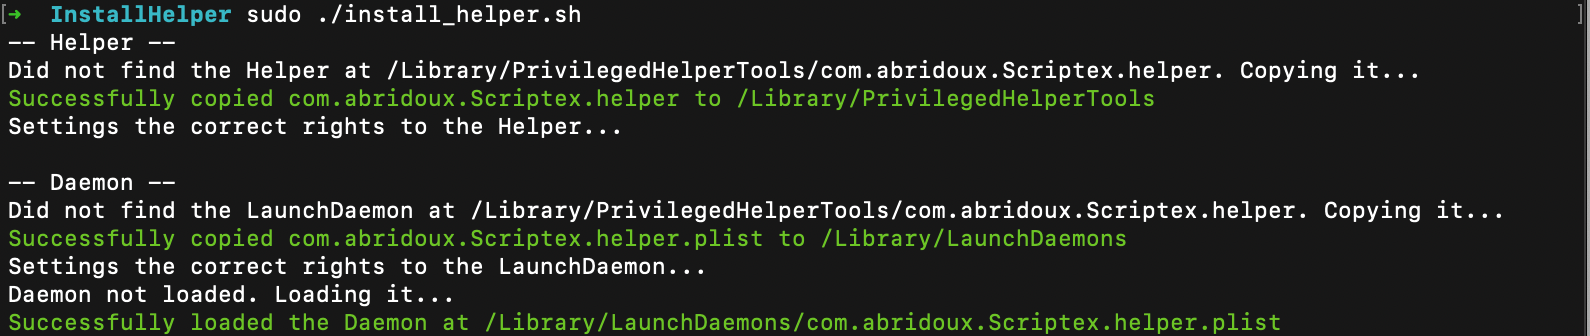
Now if you run the application, you should not be asked to enter admin credentials, although you deleted the Helper and its launch daemon. This way, things will seem seamless for your users.
And that's the end of this optional part! I hope you found it useful.
Where to go from here?
Useful links
- If you are interested into XPC services, you should definitely checkout this article from Derik Ramirez.
- Also, from the same author, here is a short tutorial explaining how to implement a launch agent with a small program.
- Example of a Privileged Helper on GitHub
- Apple documentation about elevating privileges and creating XPC services
- Another example of a Privileged Helper with a real life use case from Pro Warehouse.
- A showcase project with instructions to write a privileged Helper
- An explanation of vulnerabilities with Privileged Helpers
Reach out to me
Should you need help, or if there is some unclear part in this tutorial, you can find me on Twitter, Reddit, or contact me by email. Also, if you found this tutorial helpful, feel free to share it on Twitter.